Commutamatic:
Development Log
part two
last updated 9/22/98
Your comments are always welcome. Send me email!
We left off of the previous log page at 60 hours, with a frame
completed, and tilting, and with suspension working and with the
sway bar in place. Next comes the steering, the battery supports,
and the drive train… and everything else. Damn, this is a
big project. I think I have discovered a modus operandum
of mine: underestimate the magnitude of the job, and refuse to
recognize the true magnitude until after the point where it would
be just about unthinkable to quit. Self-deception: not just a
good idea, it's a way of life.
July 19, 1998. Sitting and staring, and cutting, drilling, and
welding up the shaft for the differential. (That means the drive
train has begun, by the way.) Also, a couple of bar latches for
holding the tilt trike from tilting for parking and pushing and
stuff. 4 hrs.
July 20, 1998. Sitting and staring. I made two design decisions:
- Steering: levers beside the driver's knees. The problem was
that I couldn't see how to have handlebars far enough back for
comfortable reach in the recumbent driving position without having
those same handlebars be in the way of entry and exit. Not to
mention safety: if I were ever in a head-on, I wouldn't want a
steel pole mounted to the frame pointed at my chest. Musing about
collapsibility, about folding for entry and exit, things like
that, began to seem too complicated to be the best path.
- Second seat: optional rear roof section. The problem here
was I couldn't see how to have a sleek cabin and still have room
for the shoulders, elbows, and head of a passenger. My answer,
at least for now, is to have the top rear section of the cabin
removable. It is the canopy for entry and exit anyway; by making
it switchable with a more roomy shape, I can have my commuting
cake and eat the two-passenger slice, too. (Sorry about mangling
the aphorism.)
These items together: 1 hour.
July 23, 1998. Drive train assembly. I am using some perforated
strips of steel like a giant erector set. I have to drill some
holes in the frame for bolting, and I have to cut these perforated
strips to appropriate lengths, but they have elongated holes every
inch, and make for very convenient adjustability. I now have the
drive shaft supported by its pillow blocks at both ends, and I
have the motor cradle almost set. 3 hrs.
Total time so far: 68 hours.
July 27-July 30, 1998. Tilting mechanism. This involves:
- fabricating pedals
- mounting pivots with bronze bushings
- hooks for the cabling, springs and and pulleys
- cabling (thimbles and clamps)
8 hrs.
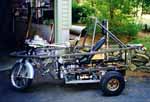
 Tiltable. You can just make out the end of the garage door spring to the right of the lower right pulley.
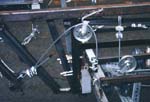
 Close-up of tilting mechanism. Notice the pedal on the left with its cable and pulley, and the cable and pulley on the right, which goes to a heavy return spring.
MILESTONE: tilts with foot pedals. You can sit about in the the driver's seat (none yet) and work the pedals, and go full tilt left to full tilt right with your feet on the pedals. Ahhh.
Total time so far: 76 hours.
 Thither and yon. I'm tilting, Jerry, and I'm loving it.
August 11, 12, 13, 1998. Steering:
- fabricating steering arms
- mounting pivots with bronze bushings
- welding up the socket wrench universal joints
- prepping the ends of the Honda handlebars to be mounted from the "wrong" ends (this will allow handgrips, throttle rotation, and brake levers to be held comfortably on the steering levers)
- final weld
8 hrs.
MILESTONE: Tilts AND steers. I bet I look insane to my neighbors, sitting on this thing in the garage a-tiltin' and a-steerin'.
Total time so far: 84 hours.
August 15 and 16, 1998. Seat and roll cage:
- seat pieces (plywood with tee-nuts imbedded, foam rubber, and fabric covers)
- seat frame
- (discover I have to extend the steering linkages in order to have appropriate recumbent position for driver - dang)
- mock-up of the roll cage... can I get in and out of the thing without whacking my head? turns out I have to build it all taller than I would have liked.
- roll cage bars cut and welded into place
8 hrs.
 Roll cage mock-up. Welding is surely more permanent, or at least harder to undo, than scrap wood and clamps.
Total time so far: 92 hours.
August 17 and 18, 1998. Miscellaneous:
- move seat frame back a bit (NOTE: it is about now that I start to have to face the reality that there is no room for a passenger. Ouch. But it's not over 'til it's over, right?)
- extend steering linkages (and make them adjustable while I'm at it)
- to allow the steering arms to tip back farther: weld in diagonal braces to the vertical ones, and then cut away the tops of the vertical ones
- start cabling up the front brake to the left hand lever
- start building throttle control cable assembly to the left twist grip
- weld in battery brackets for a total of three cells. (Ugly discovery: my clearances are just barely sufficient.)
8 hrs.
Total time so far: 100 hours.
August 14 and 18, 1998. The Road to Registration:
- speak with insurance agent (Wayne-the-patient)
- fill out and send in an application for a Vehicle Identification Number to be assigned to my new vehicle
1 hr.
Total time so far: 101 hours.
August 19-21, 1998. Wire it up:
- weld up mounting platforms for the electronics, heavy relays, lights relays, and throttle control
- add fourth battery bracket; need a 12v cell for control circuitry, and later for headlights, taillights, brake lights, etc.
- assemble cabling
- finish clamping the motor down (straps and rubber scraps)
- consult with the ecar godfather, Bob Batson at EVoA, about some wiring variables
- install 300A fuse block (traction circuit), and four fuse block (for 12v electronics
20 hours
 Driveable. A sweet, sweet moment: ready to go for a spin. Note the little
switch over the driver's head: system disable.
Total time so far: 121 hours.
This seems like a good time to break to… The Next Chapter!
Go to Commutamatic Development Log, part three.
More information about this project:
Back to Back to Max Hall's homepage.
Send me email!
 Tiltable. You can just make out the end of the garage door spring to the right of the lower right pulley.
 Close-up of tilting mechanism. Notice the pedal on the left with its cable and pulley, and the cable and pulley on the right, which goes to a heavy return spring.
 Thither and yon. I'm tilting, Jerry, and I'm loving it.

