 The golf cart has lots of good parts besides its motor. The 36 vdc motor is just one
piece. Tie rod ends, battery charge meter, battery cables, springs, brake cables, "weld-on holes," and
on and on.
Commutamatic II
Maxion
development log, part three
in which the thing can roll.
last updated 08/16/1999
Your comments are always welcome. Send me email!
The story resumes now, after a total cost of $481 and total time of 41 hours, with a work-in-progress chopped-up chassis. (The story started with Part One, and continued with Part Two.)
June 23 to June 27, 1999. After a long hiatus, I am back at it. (The rest of life impinged. Job, stuff like that.)
- Buy more steel. $60.
- Buy brass bushings, well, 8 of the 12 needed. $32.
- Buy pillow blocks, drive sprockets, input sprockets for 1/2" chain. $210. (Ouch. But it's that or spend who-knows-how-long in dumpsters.)
- Cut away a little more of the vestiges of the non-leaning front end.
- Finish "keel" of cabin, and thigh-height side pieces.
- Replace 2x4 mock-up cross members with welded steel subframes.
- Get the golf cart out of its winter storage (up in the woods). Disassemble front end for tie rods and tie rod ends.
- Design and fabricate brackets for connecting driver's handlebars to the front forks with the aforementioned tie rods.
Total cost so far: $843. Total time so far: 69 hours.
 The golf cart has lots of good parts besides its motor. The 36 vdc motor is just one
piece. Tie rod ends, battery charge meter, battery cables, springs, brake cables, "weld-on holes," and
on and on.
Drilling steel is time consuming: center puch, oil the bit, drill. Stop and oil. Drill some more. Change bits to the next size up. Oil the bit. Drill. Stop to oil. Finish hole. Etc. To drill a single large hole (say 3/8") can take up to five drill-bit changes. Not only is it tiring, it sometimes weakens the piece being drilled (less material left). Applicable in many situations: the "weld-on hole."
Since I can cut steel easily (14" abrasive wheel cut-off saw) and welding is quick and strong, what I often do is cut a piece of steel with an appropriately sized hole in it, from some bracket or another from, say, the golf cart, and weld it where I need the hole. Bang. Done.
June 28 to July 2, 1999. Root canal narrowly averted, and the pain slowed me down. But still...
- Buy 5/8" drive chain and sprockets for the second stage (intermediate shaft to rear wheel). $80.
- Buy miscellaneous steel stock over at the hardware store. $10.
- Finish steering assembly. Nice!
- Add a few more reinforcing parts.
- Install seat. (Oh yeah, the seat was $35 from J. C. Whitney.)
- Put in pedal mounting bar, fabricate brake pedal (stop!) and accelerator pedal (go!).
- Remove brake cabling from golf cart, continue layout.
Total cost so far: $968. Total time so far: 85 hours.
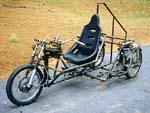 Taking shape. The steering is in place, the seat is settled, and controls are next.
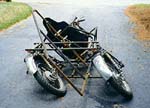 And it leans. Last year's model, Commutamatic, leaned about 25 or 30 degrees. The Maxion stops its roll
at 45 degrees.
July 3 to July 8, 1999. Chuggin' along, but I'm not going to be rolling for the Microcar Classic. Oh well.
- Miscellaneous nuts, bolts, and bits o' steel. $50.
- More chains and sprockets from Olmstead Flint (love those guys). $30.
- Redo bushings in tilting linkage.
- Build motor mounts, left and right.
- Prep right side motor. (Cut up flange, test motor, weld on sprocket.)
- Assemble drive train, right only.
- Prep left side motor. (Remove it from golf cart, test it, weld on sprocket.)
- Add to roll bar, add mounts for lap-and-shoulder seatbelts. ($40 for the seatbelts, J. C. Whitney)
- Fabricate left foot pedal; the one which will lock the tilting mech. (When you stop, you need to keep the bike from tipping.)
- Complete brake assembly.
Total cost so far: $1088. Total time so far: 125 hours.
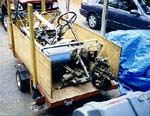 The golf cart has lots
of good aluminum for the metal bin. The golf cart's chassis and an 18 hp OMC motor with cylinders and heads
removed are just some of the trailerload of scrap metals that are bound for recycling.
July 9, 1999. Miscellaneous clean-up for the Microcar and Minicar Classic.
- More nuts, bolts, threaded rod, etc. $20.
- Reseat all six brass bushings in tilt mechanism.
- Add six steel hooks for counter-balance springs.
- Fabricate tilt-lock connecting rod (from left pedal) and tilt-lock mechanism (pinches cables).
- Weld new struts to bottom horizontal frame assembly.
Total cost so far: $1108. Total time so far: 135 hours.
July 10, 1999. Microcar and Minicar Classic: Test Flight!
I unloaded the thing from a trailer, with the much appreciated help of the local scooter contingent, at the top of the hill at Larz Anderson Park in order to get my scooter out of the truck. With time before the scooter ride and the Microcar and Minicar Classic lawn event, someone suggested I take it for an unpowered ride down the long hill to the site of the minicar show. Excellent idea.
I put on helmet, gloves, and my leather jacket, and settled into the seat. Jon and Jay, the Kildevil Crew of 1999, gave me a push, and off I went.
It was heavenly. It rode well, it even rode pretty fast. The tilt lock worked nicely, as did the brakes. (Phew.) The handling was lively and responsive. The ride ended as I coasted onto the grass, to the amusement of those awaiting the lawn event.
How sweet it is.
July 11 to 19, 1999. The road to a test drive.
As it pours down rain here (well needed precipitation) I am pausing for an update.
- More nuts and bolts, T-nuts for constructing the battery boxes, etc. $15.
- Plywood. A sheet, more or less. $30. Plus free scrap from a packing crate. These are for the battery boxes.
- Touch up or augment welds.
- Finish the bottom frame; add an awiating piece.
- Add a new brake cable sleeve stop (the first was misplaced and caused too much stretch at full right lean).
- Add bracket behind back of seat for the lower two points of lap-and-shoulder harness.
- Cut plywood electronics deck. (The controller, contactors, fuse block, system enable relay, etc., will all live here.)
- Plan position for forward/reverse switch.
- Weld on holes for battery box supports, electronics deck, and speed control "potbox" (near foot pedals).
- Plan shape and location of roll cage top.
Total cost so far: $1153. Total time so far: 155 hours.
July 20, 1999. Big day with a big conclusion: the test drive.
Really a matter of doing the wiring.
- Finish making the battery boxes.
- Discover that the 6 6v batteries are too much for the rear suspension; retreat to last year's configuration of 3 12v batts.
- Worry about the big oops overestimating the rear suspension. Feel shame.
- Fabricate temporary high-current wires.
- Install electronics deck, screw down components.
- Fabricate push rod from "gas" pedal for throttle cable.
- Jack up back end, attach last power cable, test. The wheels spin fine.
Here's how it went: I got my wife out with the camera to document the moment, then I drove it. My tilt lock mechanism was not good enough, though, and when one of my tilt limiting nylon ropes broke, the tilt lock was insufficent to keep me from steering into the woods. Dang. But it went pretty darn well!
Total cost so far: $1153. Total time so far: 163 hours.
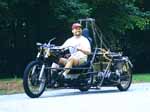 Happy driver sets out. The first test drive.
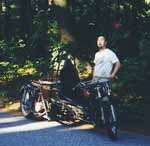 Happy driver pulls vehicle out of woods. Oops! You have to either run in tilting mode, or not. You can't
have both.