Mar 10.
I spent a little time with Scoot Two today. I found that some screws came out (steel in aluminum!) without too much trouble; encouraging! The head of this odd-ball "twingle" was off. I blew out what crud was over each of the pistons and lavished the bores with Marvel Mystery Oil. (I will go to what some "Fall Off," or acetone and ATF, if it comes to that, I guess. Seems ugly, though. And doesn't acetone eat seals?) In general, as ever, anywhere there was dirt-caked oil or grease, the parts were fresh as the day they were assembled. Magical.
Some places I needed some heat. A little MAPP, all good. The clutch (I think?!) foot lever (cast aluminum part over steel pin) did not let go... it's sitting with some MMO. Rear brake assemply seems ok! The cover over the drive chain from the output shaft to the wet clutch was loose. I took it all the way off, oiled up the chain.
I think the skirt of the flywheel is siezed to the housing. MMO. Will wait. One broken fin, some chipped fins. Here's hoping its not too unbalanced, because the flywheel on Scoot One is trash (cracks... as though someone tried to pull it inelegantly). Contact points look ok... not much to say about that until I can rotate the crankshaft. No idea about the dynastarter... it has brushes, I know from some guy's Hercules website, so I might want to get in there. I don't know if a flywheel puller is needed, though. A lot to learn, still. Patience is the thing. More later. Hey, by the way, it has a 12v system! Pretty impressive for 1957. (1 hr.)
Mar 11.
Nothing much to report... an hour of gentle persuasion, or attempts at gentle persuasion. It seems that the little seized lever at the rider's right heel is to activate a pop-to-neutral mechanism. Cool. The rear brake assembly is fee and functioning as it should. One of two shifter linkage cables is good, the other is soaking up some MMO. All of the other cables seem to be toast... I will look to Scoot One cables for some alternatives. And then, to Anna for the rest! I love that this thing has a dynastart. (1 hr.)
Mar 15 & 16.
I decided I have to take the motor/swingarm off of the frame. It's a matter of a brake cable, spring mount, shock mount, then a pair (should be three, one missing) mounting bolts that hold the engine casting to the pivot assembly. Got to the pair of mounting bolts. Spent about 30 min trying to remove them... got one, and the other on the run. Patience, MAPP gas, Marvel Mystery Oil, and judicious torque. Knock wood: No broken bolts or stripped threads. (2.5 hr)
Mar 19.
Warm afternoon! Fussed with more cables, pop-to-neutral foot padal, electrical switch on the dash. The speedo goes up CCW, not clockwise like most. Crazy bike. Speaking of which: It is a really well-built machine. Elaborate castings, adjustability everywhere! (1.0 hr)
Mar 20.
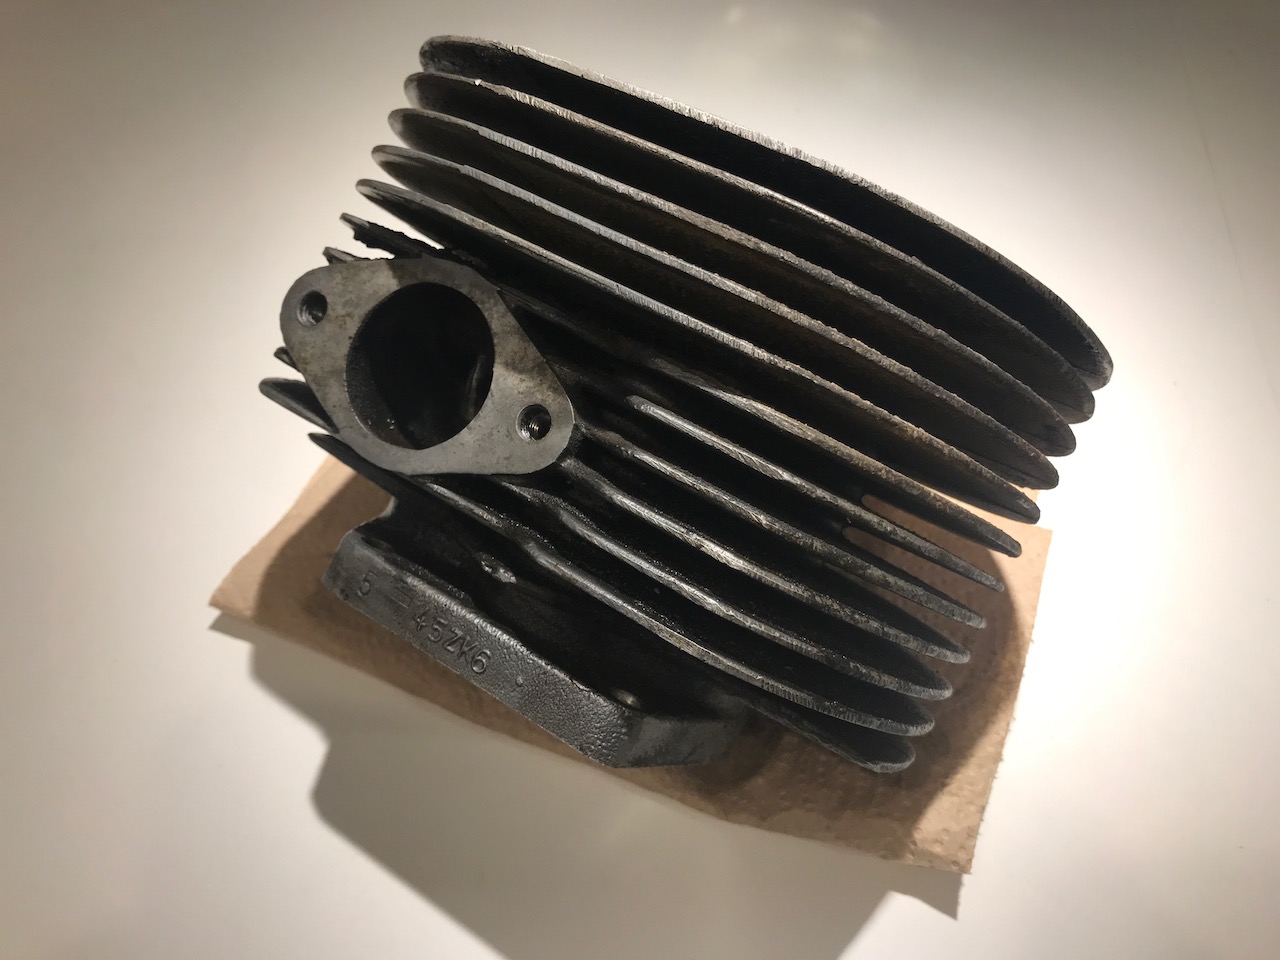
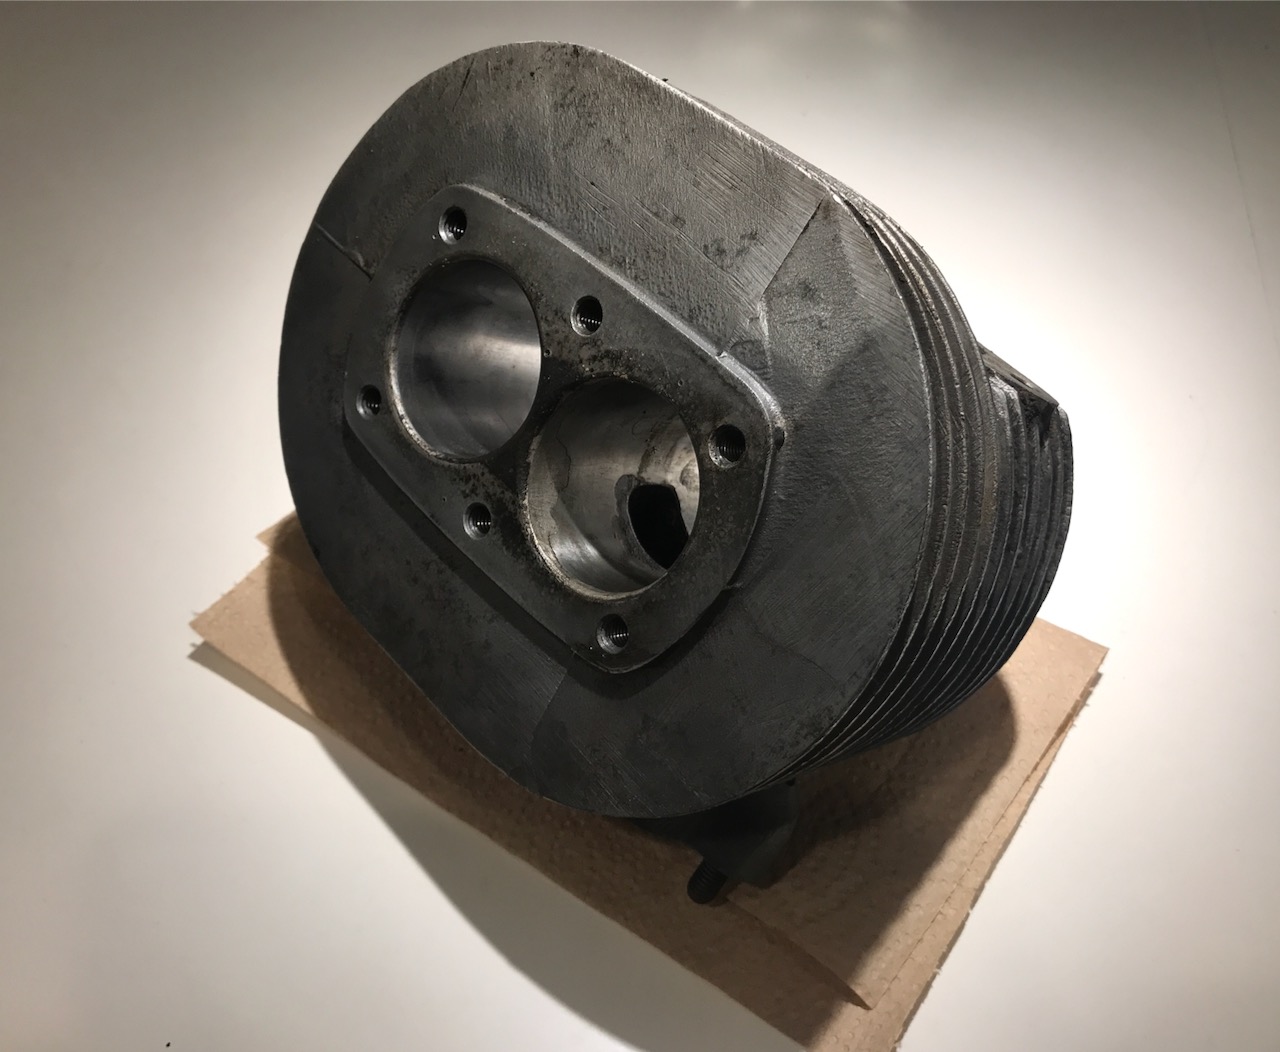
The equinox. And it feels like spring-y! 55F in the driveway, some good music playing, and the smell of Marvel Mystery Oil sweetening the air. More cleaning, more heating and oiling, more love taps. With the motor out and up on a bench, I got a better look at the cylinder walls... sadly, I see some of that chrome plating is off. Worst spot it is missing from the gasket down about 18 or 20 mm. There are some flakes missing from above the forward half of the exhaust port, too. (2.0 hr)

Flaked chrome plating, looking forward on left cylinder. It is the cylinder with the ports -- the right cylinder, portless, seems to be perfect. (Still more to come... pistons remain stuck.)

Flaked chrome plating, another view farther around to the right.
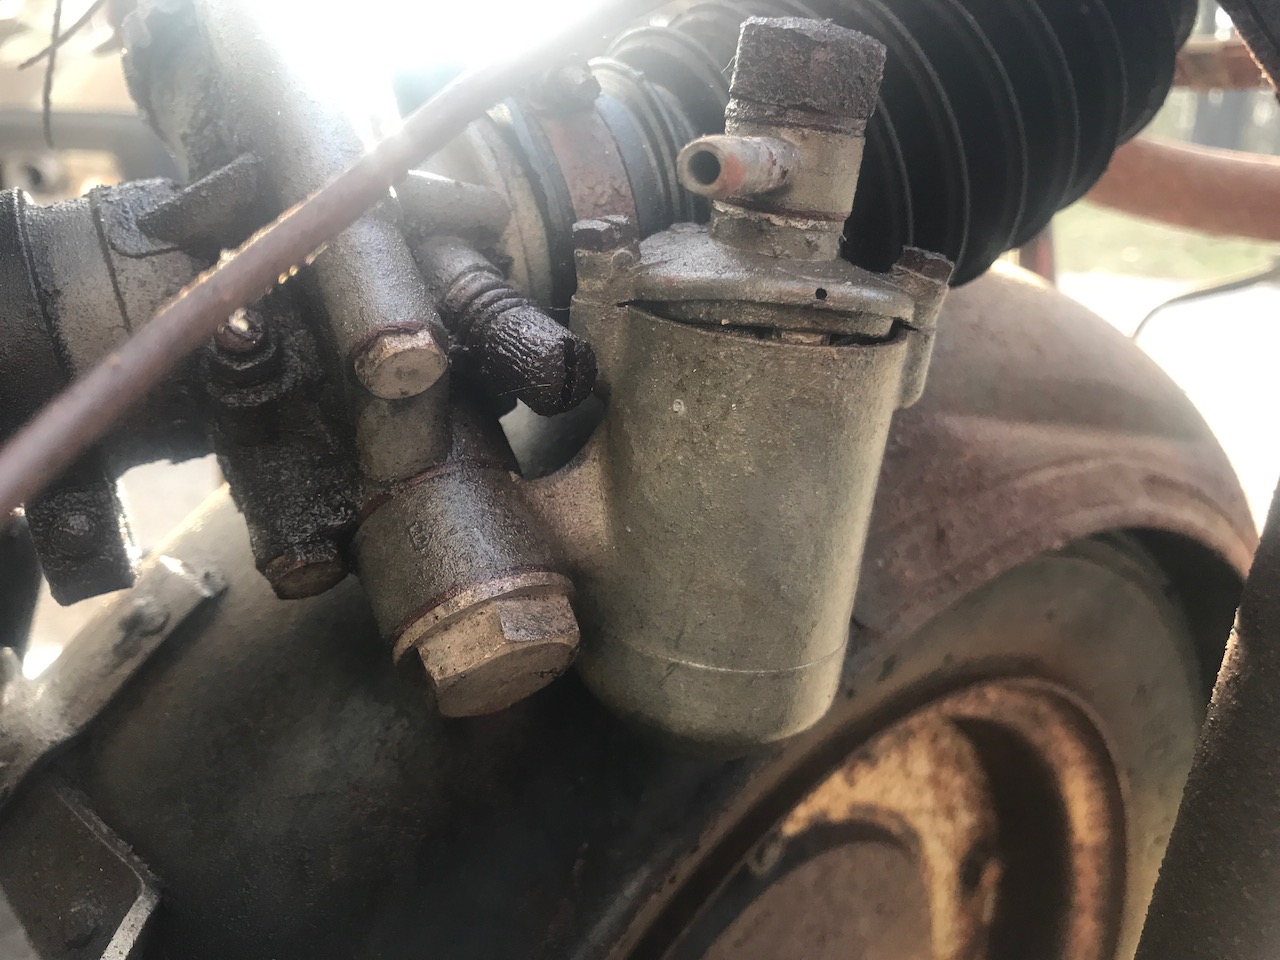
Hello, beautiful.

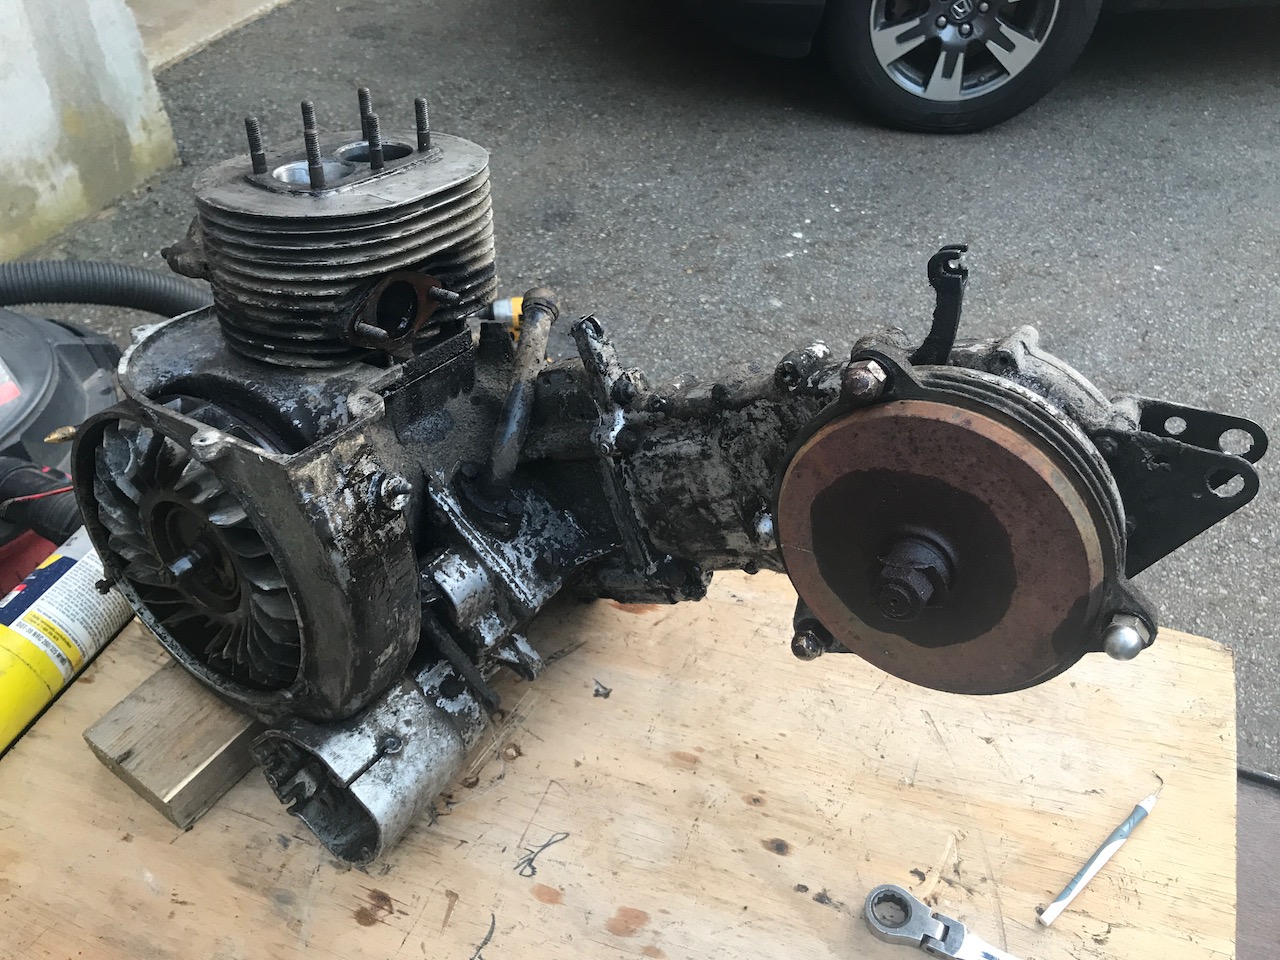
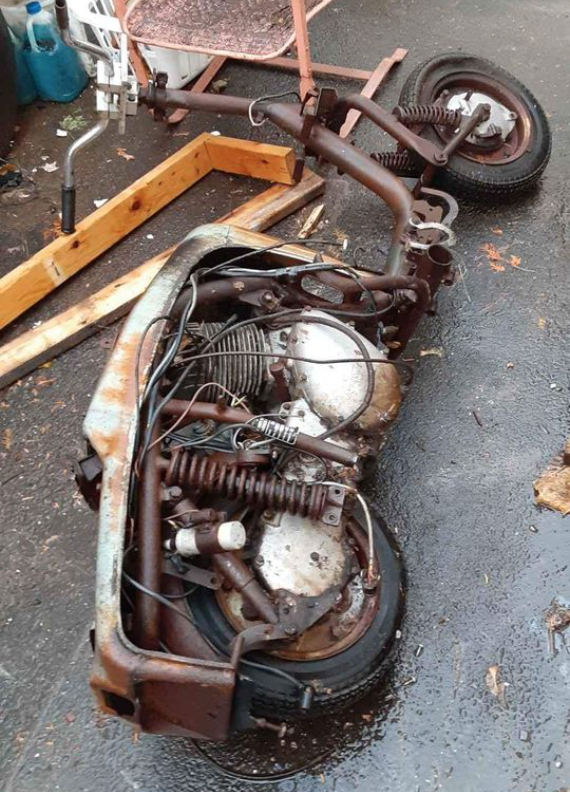
Scoot Two, swingarm out.
I wrote to Tom and Anna for love and support. They gave me tough love: "Yikes!!! That is bad." They gave me support: An offer to connect me with the guy who rechromed (or maybe Nikasil?) their Contessa jug. And a warning: "You do NOT want to bend that conrod by putting too much pressure on one piston." (I had seen Tom make that warning on the TWN fb page previously. Word to the wise!) They are the best.
Next step: Open up the head on Scoot One, whilst praying to the scooter gods for an intact plating. I'll get back in touch with Tom and Anna once I have a good assessment there. I expect I will be taking them up on their offer to connect with the plating guy!

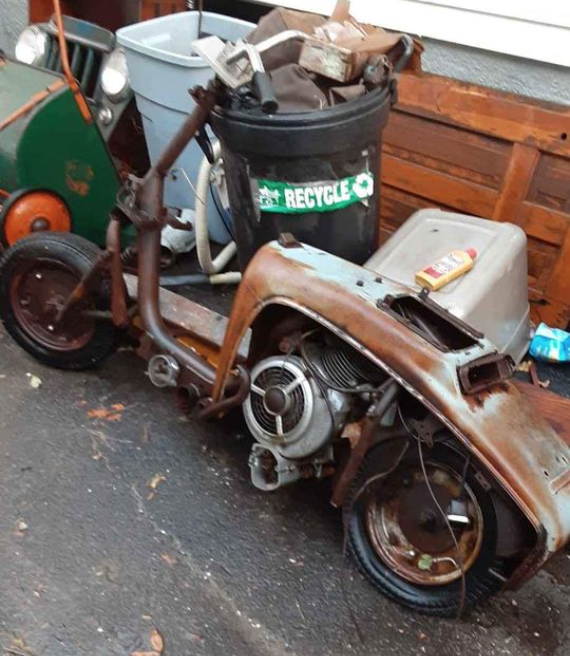
Scoot One, standing by.
Mar 21.
Barely any time today. Among other things, I got out for a ride on the Ser2 Lammy to visit other humans! Pretty nice. Anyway, got the head off the engine on Scoot One. Pistons are at or near the top of the stroke. I have no idea whether that's good news or not! Probably means nothing either way. Anyway, lots of corrosion on the piston crowns. Can't tell about walls yet. Started the Mystery process. Heat, then oil. It *looks* as though the oil is disappearing... here's to good capillary flux. Might have to get the engine out of that bike there, too, to get at the jug nuts, ports, etc. (0.5 hr.)
Wrote back to Tom and Anna. I'll keep them, and you, updated.
Mar 22, 23.
Keeping up the low-key approach. About an hour a day in the afternoon light... pretty fine. More MMO, and starting to take apart Scoot One so I can try to get its cylinders unsiezed. It's really crusted up! If I do end up going the Nikasil route, I am certainly going to do two at once if I can. Either I will use the second, or someone will be really thankful to get a hold of one! I did break a stud today... first one, amazingly. Despite heat and MMO, I snapped off the remaining one of two at the exhaust port. Sigh. At least they match. (Someone torqued the other off a long time ago.) There is a little evidence at the crown of the left piston and in the head that a piece or pieces of metal got loose and did some banging around.

Scoot One left piston crown and head with some excess action.
I also had a nice vision of a piston pusher. Like a flywheel puller, but it presses the pistons down into the cylinders. If the jug is unattached from the bottom end, then all the force is between the pistons and the jug... no force on the special and scarce y-shaped con rod, nor the crankshaft, nor anywhere else. And no blows. A plate connected to the jug on the head studs with big screws for pushing longitudinally into each cylinder. With approprate buffer parts (so that the force is by the walls, not on the piston crowns (!)), this should get reluctant pistons out. It would have room to oil, heat, and *measure* (so that I can assure the pistons are pushed exactly the same distances!)
(2.0 hr)
Scoot One. A litle wire and some juice cans and this baby will sound great again.
Mar 24.
Finished taking the engine/swingarm out of Scoot One. Combination of rust, corrosion and other oxidation even as some parts have oily sludge that kept them protected... and removable! For example, exhaust is a wreck, but the shift selector box right next to it was full of a water/mud/oil mix, and I got the screws out without much fuss. Too bad about the carb: Looks like it got full of water and froze. Probably more than once. The lid, at least, is probably unrecoverable. Nonetheless, I have got MMO puddled on the piston crowns and in the exhaust port. (Haven't take the carb off yet... must be done patiently and daintily!)
Mud, oil, water. The bayou.
Freeze-thaw cycle on a water-filled Bing carb. Pop! Bent screws, too.
I keep finding parts that are so marvelously overengineered. The swingarm pivot, for example. On a Lambretta, it's a rod with threads at either end; washers and nuts hold it in place. No Zerk fitting. On the Contessa, it is a rod threaded at both ends, and with a Zerk fitting to push grease into a central reservoir, and then the grease has room to travel in a helical cut along the rod. This is not to mention the combination of split and threaded parts that hold the rod in place. Incredible. And I love it.

Left: swingarm pivot from an old Honda CB175. Right: hyperengineered awesomeness from Nürnburg.
Anyway, next step will be to build my piston pusher. Now that both engines will have had an oil soak and some heat cycling, it's (almost!) time to extert some well-guided force. (1.0 hr)
Mar 25, 26.
I didn't expect to get time on Thur, but I did! I also didn't expect to get knocked upside the head by the safety fairies, but I did! Started building the piston pusher. Started with holes in a 3/8" mild steel plate. While oversizing one of the holes, the plate helicoptered on the drill press, and three already-drilled holes swept under my bare, pressing-down fingertip and grated. I can't believe how tough skin is! Nonetheless, I lost a bunch. Dumbass. The safety fairies gave me yet another warning, and I got it, again. I have to relearn obvious things from time to time. (1 hr.)
Friday pm I finished the pusher set: two disks, each with an O.D. the size of the cylinder bore and a hollow bottom, designed to distribute force to the piston sides (*not* crowns). A plate, with 3/4" nuts welded in for the push screws, and mounting holes that align to the head studs. Went to work: assemble, push, disassemble, measure and inspect; repeat. Moved the pair down about an inch. Nice. The inside of the bottom end is pretty corroded... but it was cool to see the y-shaped conn rod, and to think that it probably hasn't seen daylight since 1957. Got some more Marvel on the piston skirts and around the bottom end. (2 hr.)

Crown protectors. One already settled.
Cranking away. In this case, the nuts are under the plate; there is room to use the plate inverted.

The famous y-shaped connecting rod. First glimpse of daylight in probably 65 years.
I wonder how the bottom end is on Scoot One? Will the fact that the pistons are at or near TDC mean protection? Or was there a lot of water in there, like the carb or gear-change box? Gonna find out soon, I hope! I am still hoping against probability that the jug on Scoot One is usable.
Mar 27.
Scoot Two: Pistons out! Nice. The plating has its worst problem where visible before. The newly-exposed cylinder walls are really fine. Not that the jug is suddenly now usable... doomed as before. But just may be a hopeful sign for Scoot One. The bottom end is really crusty. Got some oil in there. Pistons are in good shape... one ring free, even! (Topmost on right cyl.)
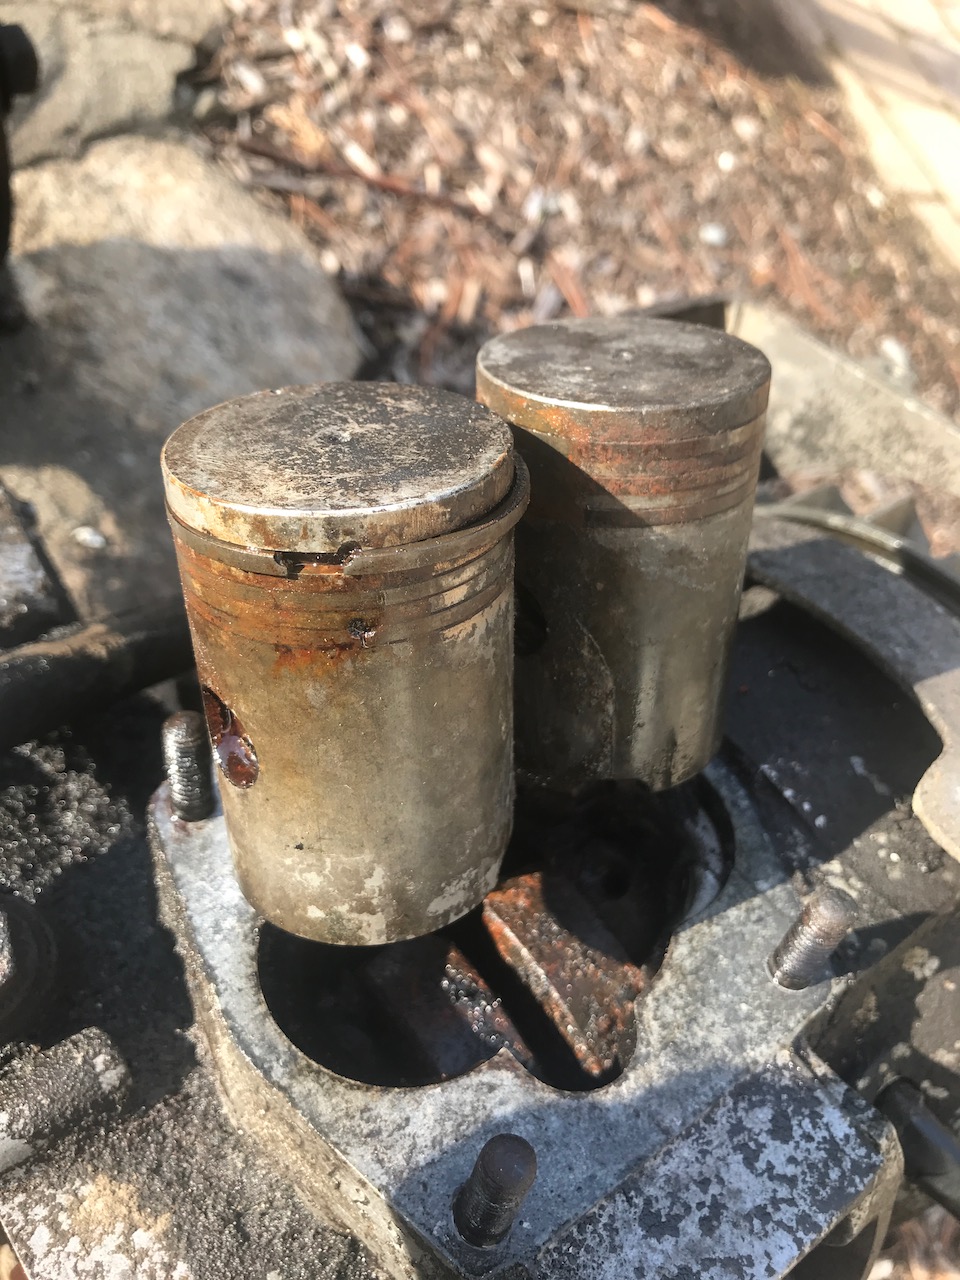
Pistons out! One ring is free!
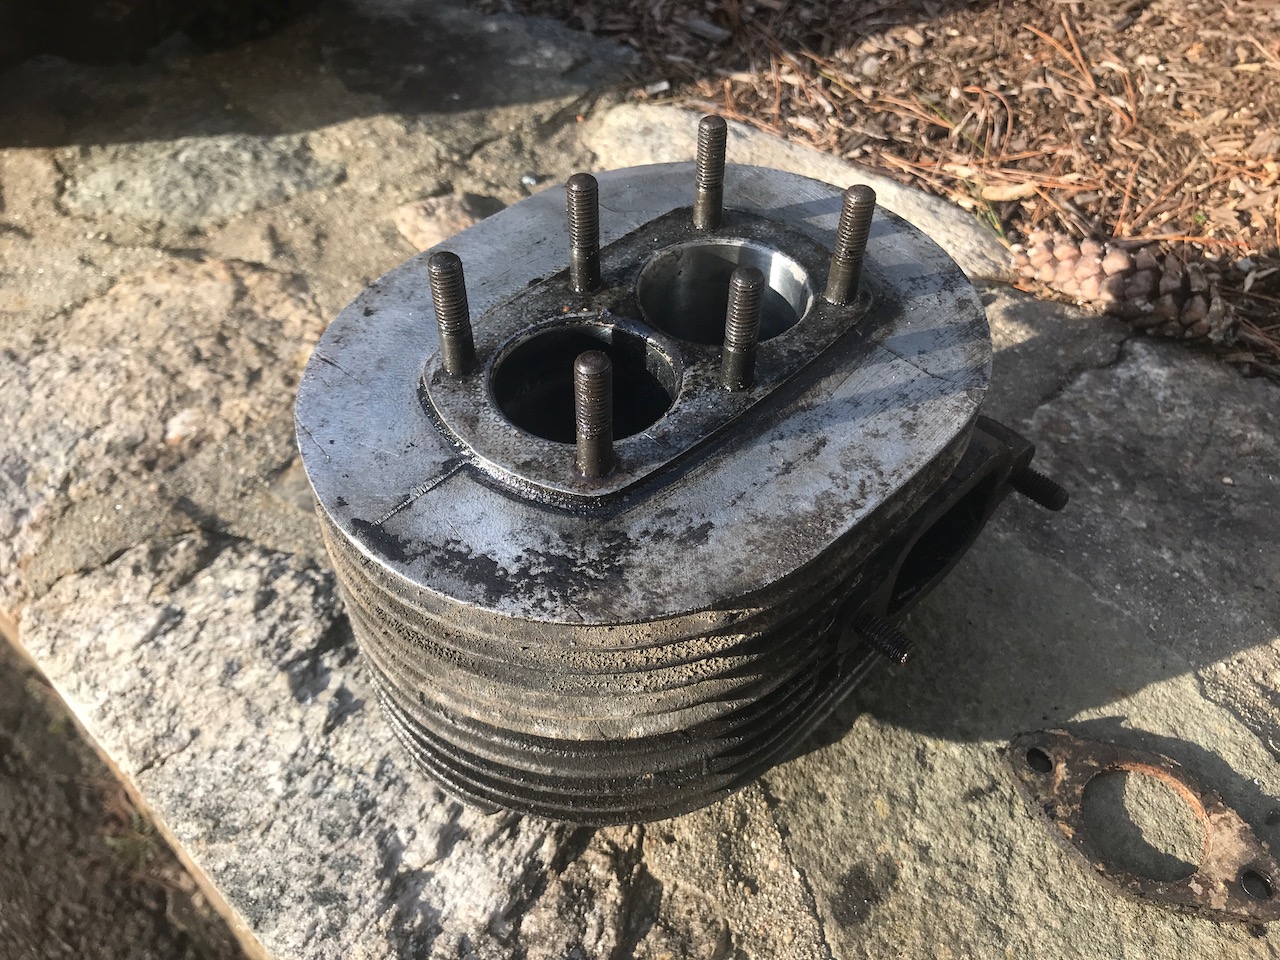
The jug.
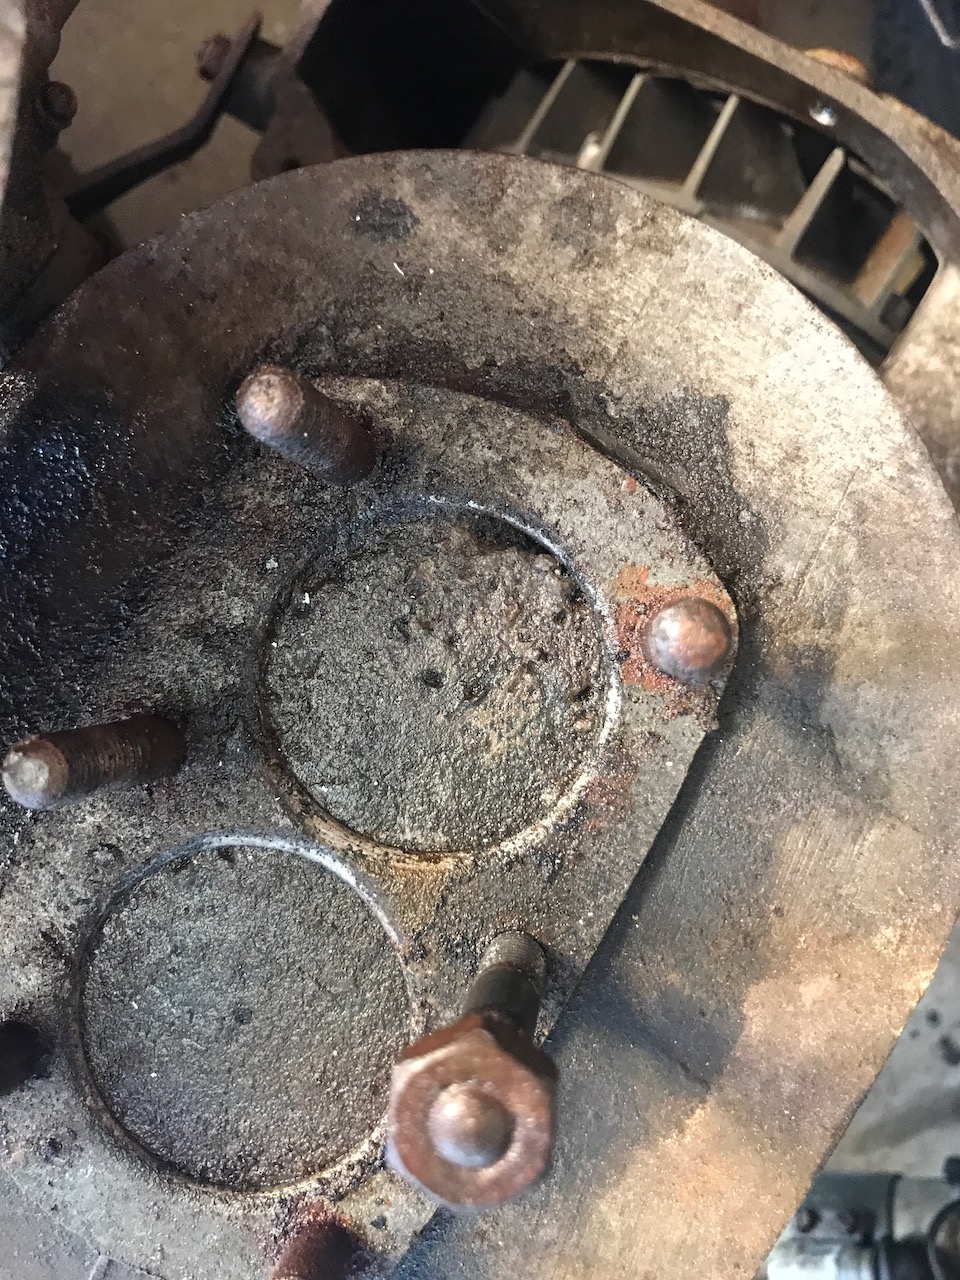
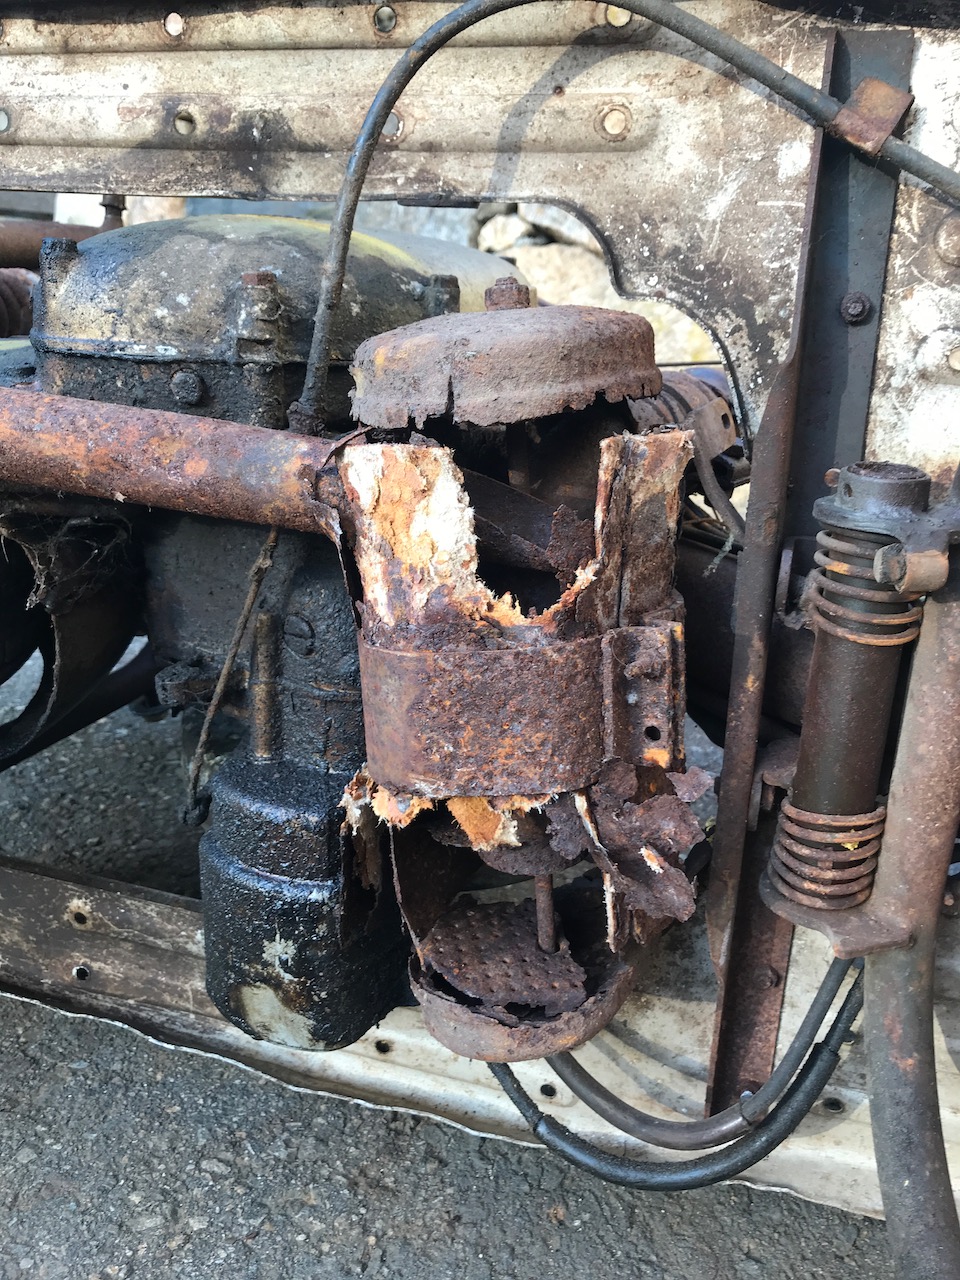
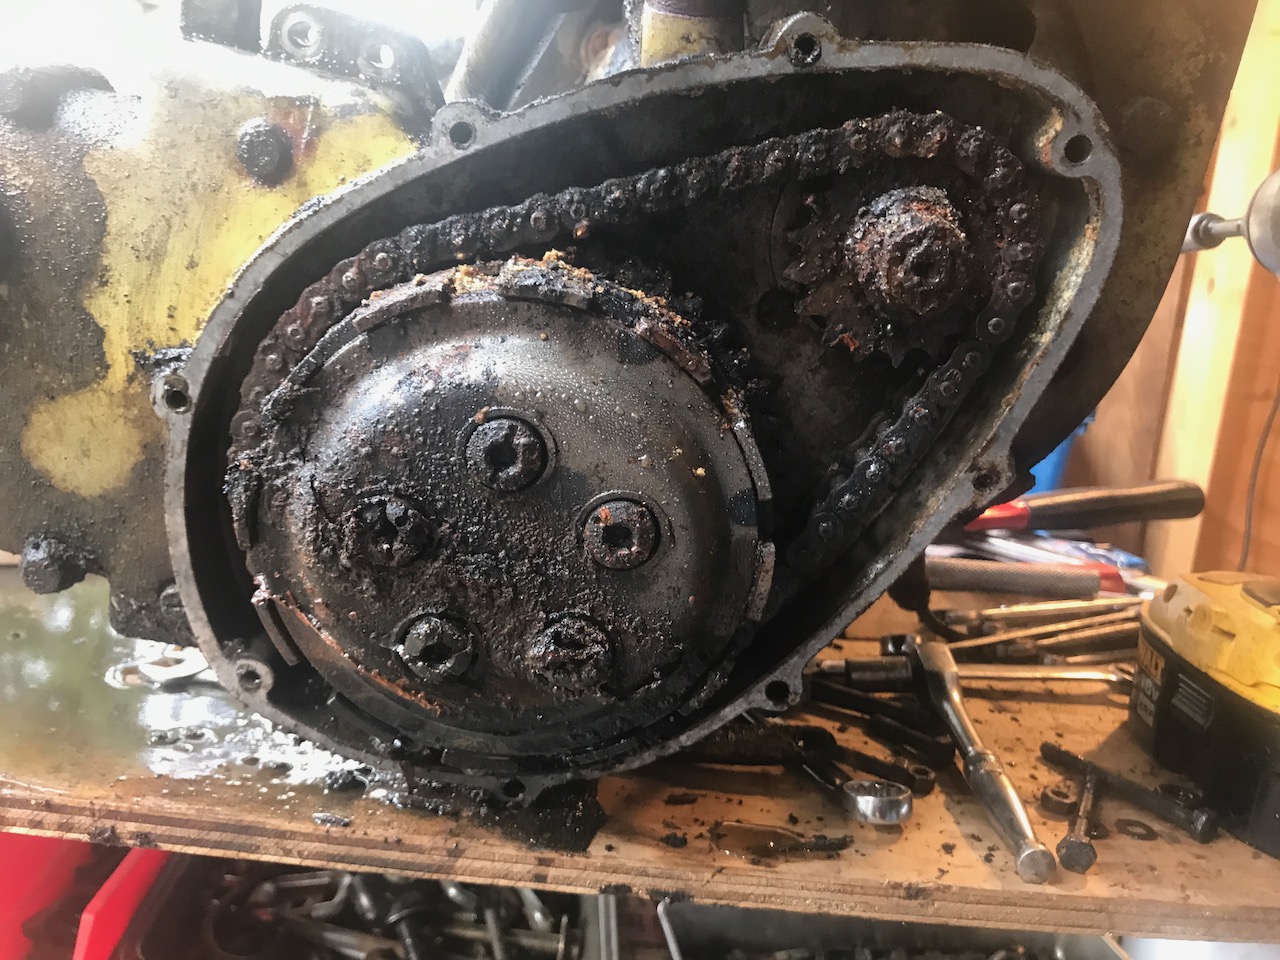
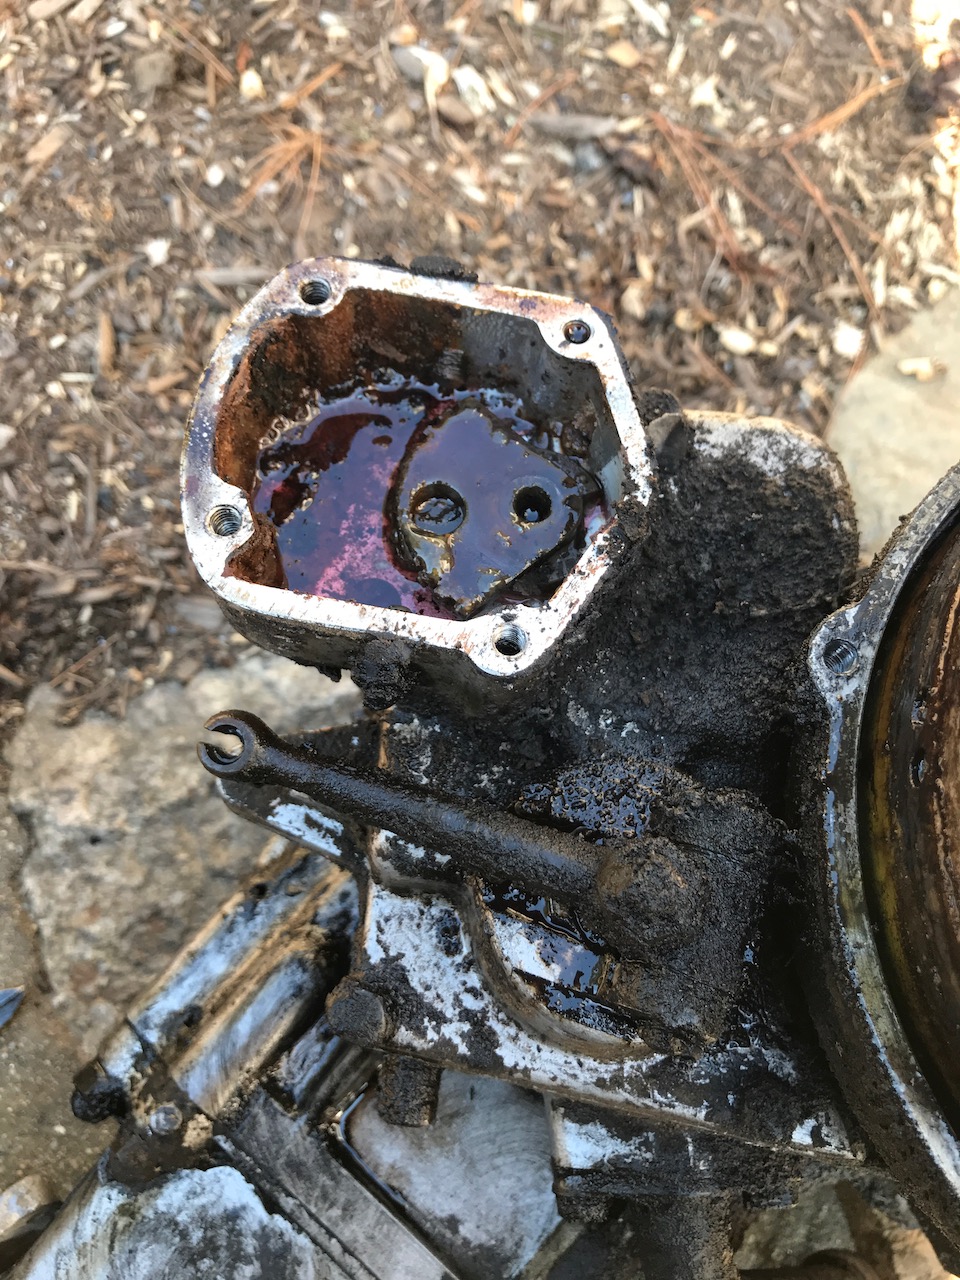
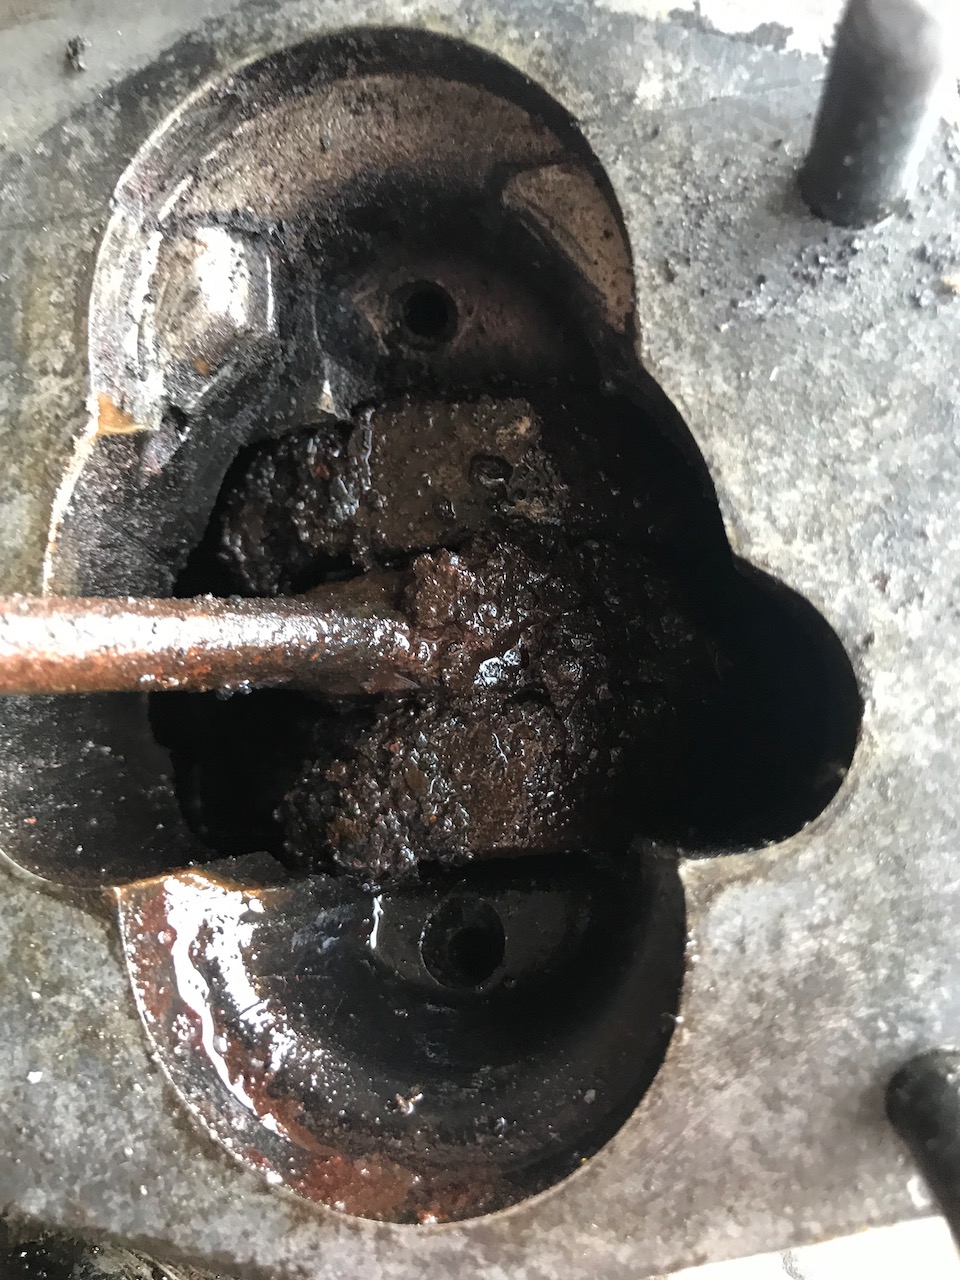
Went after the engine on Scoot One. Got the rear wheel off the hub, took off the four jug nuts. (Happened to have a set of hand-me-down crowfoot wrenches from my father-in-law... the exact right odd tool for the task.) Used two torches to heat the jug from the top, got it about too hot to touch. More MMO. Oil seems to be seeping down from the crowns into the walls; great! Don't know how much surface it's getting to, of course. Got the carb off, got some oil into the bottom end through the intake. Put the piston pusher in place and applied some torque... nothing. NOTHING. Seems I need more heat, oil, and time. Opened up the clutch compartment... full of water, mud, and oil, in decreasing order. Crusted up good. Between that and the evidence in the shifter box, it seems that this bike spent time in standing, muddy water. A little wirebrush and some MMO to start that freeing process. One more step getting the flywheel cover off: gapped it a little and oiled some more. Left the pushers torqued up a little. (3.0 hr. which is 19 hr so far.)
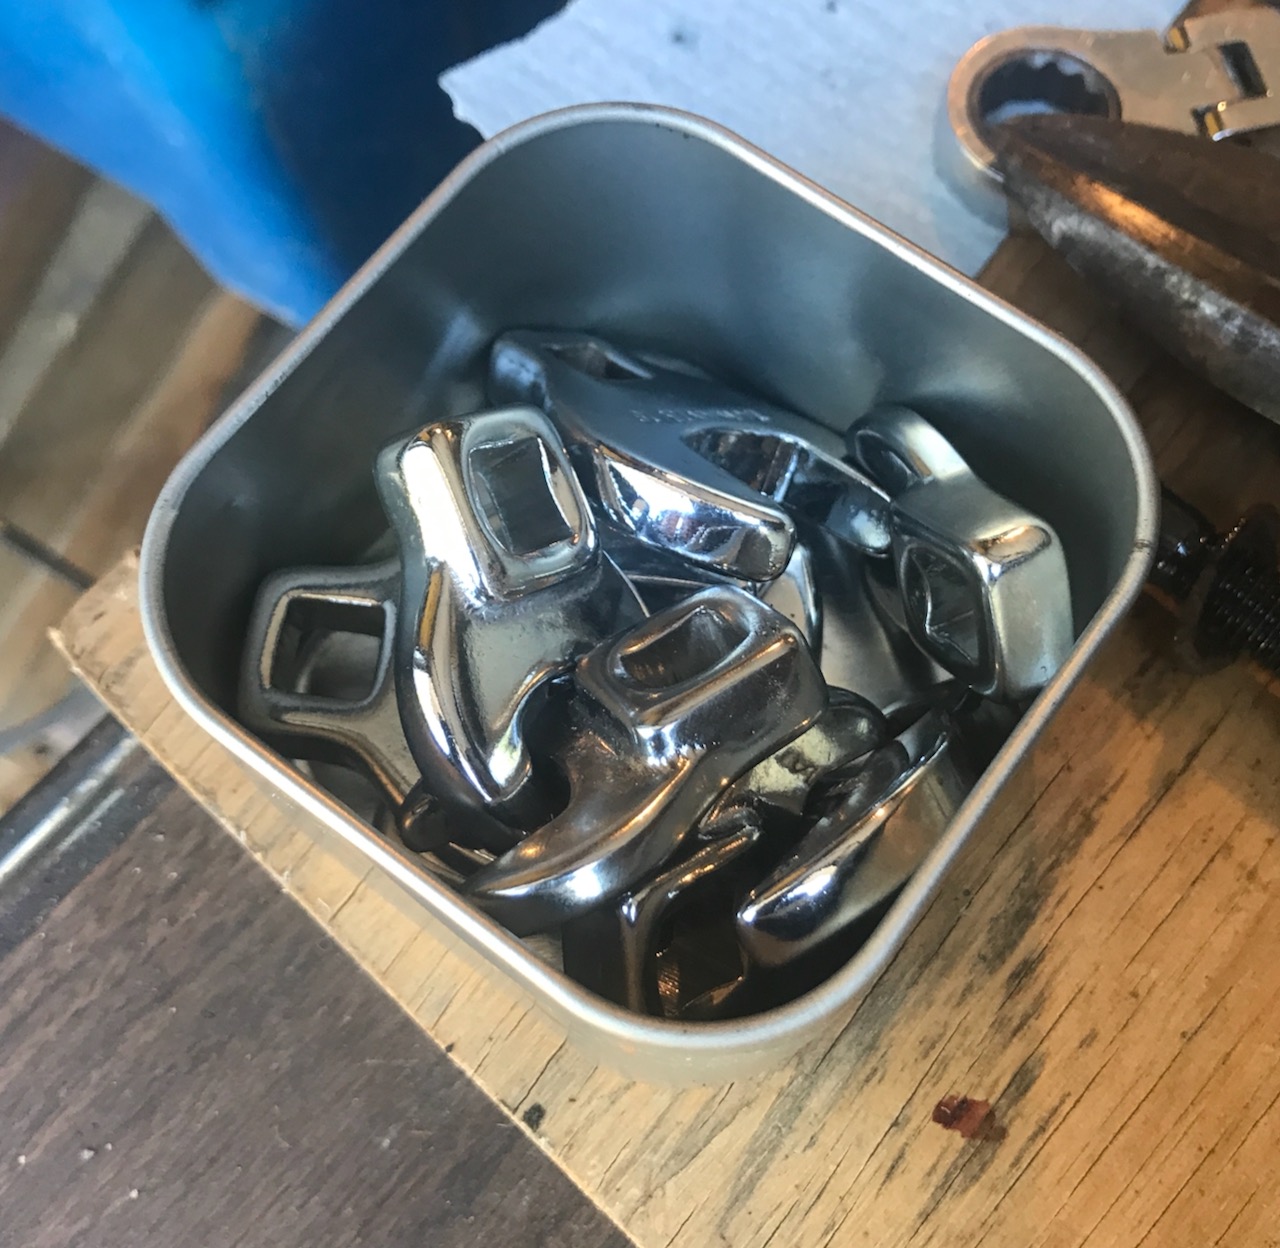
The crowfoot wrench set.
Some water got in there.
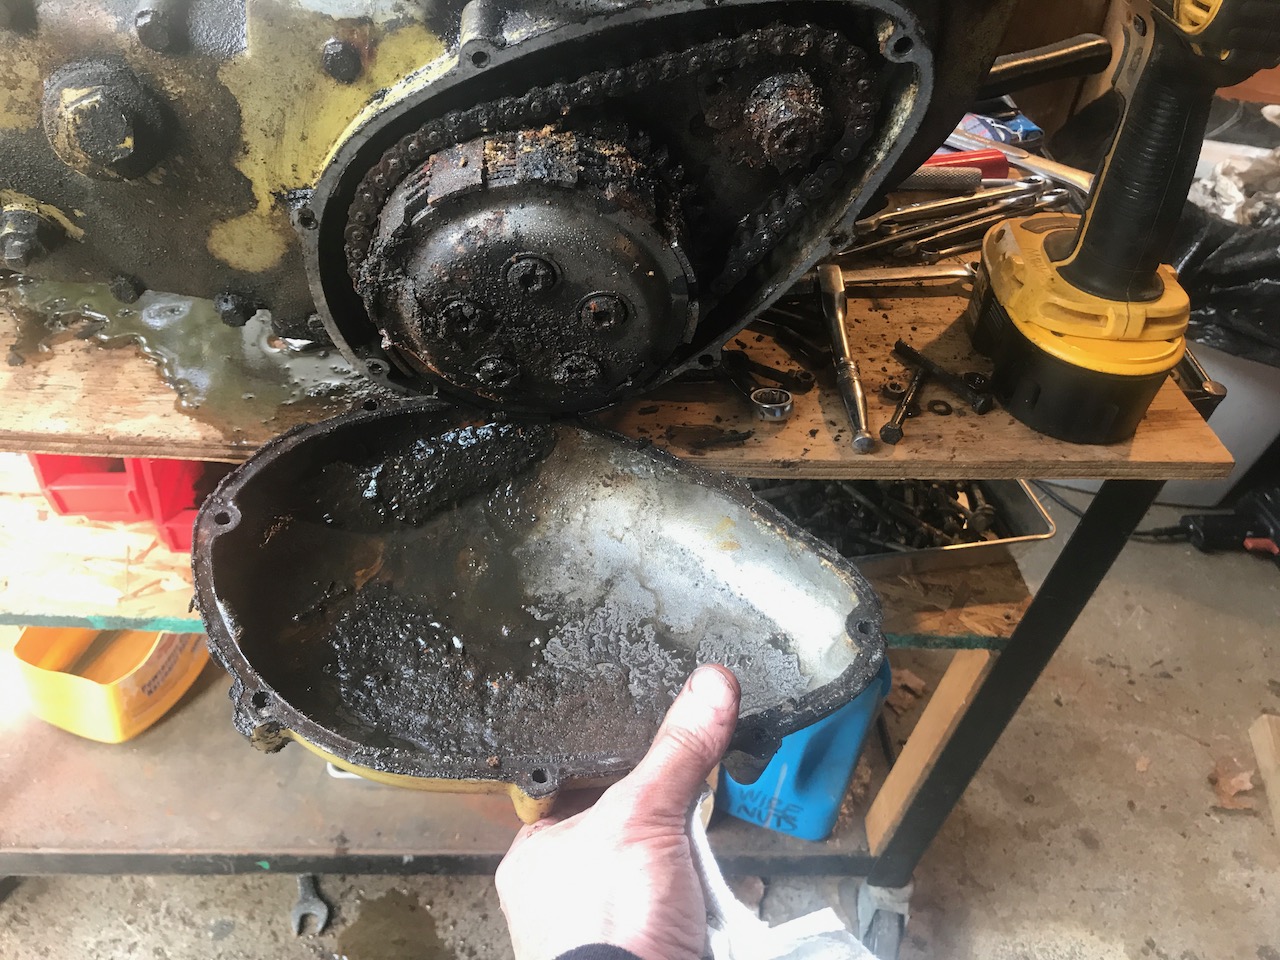
Oh, and some mud.

Two pistons down, two to go. On Scoot One, the piston crowns are so high I needed spacers between the jug and the plate, and the plate had to be flipped up so the nuts, on top, gave more room below.
Apr 4.
Not much to report... very little time to spend on the TWiNs. I have been oiling, that's about it. Got a little time yesterday; went after the cracked fan on Scoot One. That way I can see how the fan/flywheel/dynastart assembly is held together to give me hints for Scoot Two. On Two, the fan screws are out but the fan is holding on. Scoot One taught me that it's likely to be just aluminum-to-aluminum siezing, so oil, heat, time, and a little more gentle persuasion will likely do it. The fan on Scoot Two is already in pieces, and has cracked and missing fins, but I'll keep it around for posterity. Also did a little more oiling of the piston rings on Two. One ring (the loose one) is ok, the others are all cracked, brittle, and coming out in pieces. Ok. Need Tom and Anna to help me with NOS or reman ones... need to find out about that before I send the jug(s) in to be Nikasilled. (1 hr., 20 so far.)
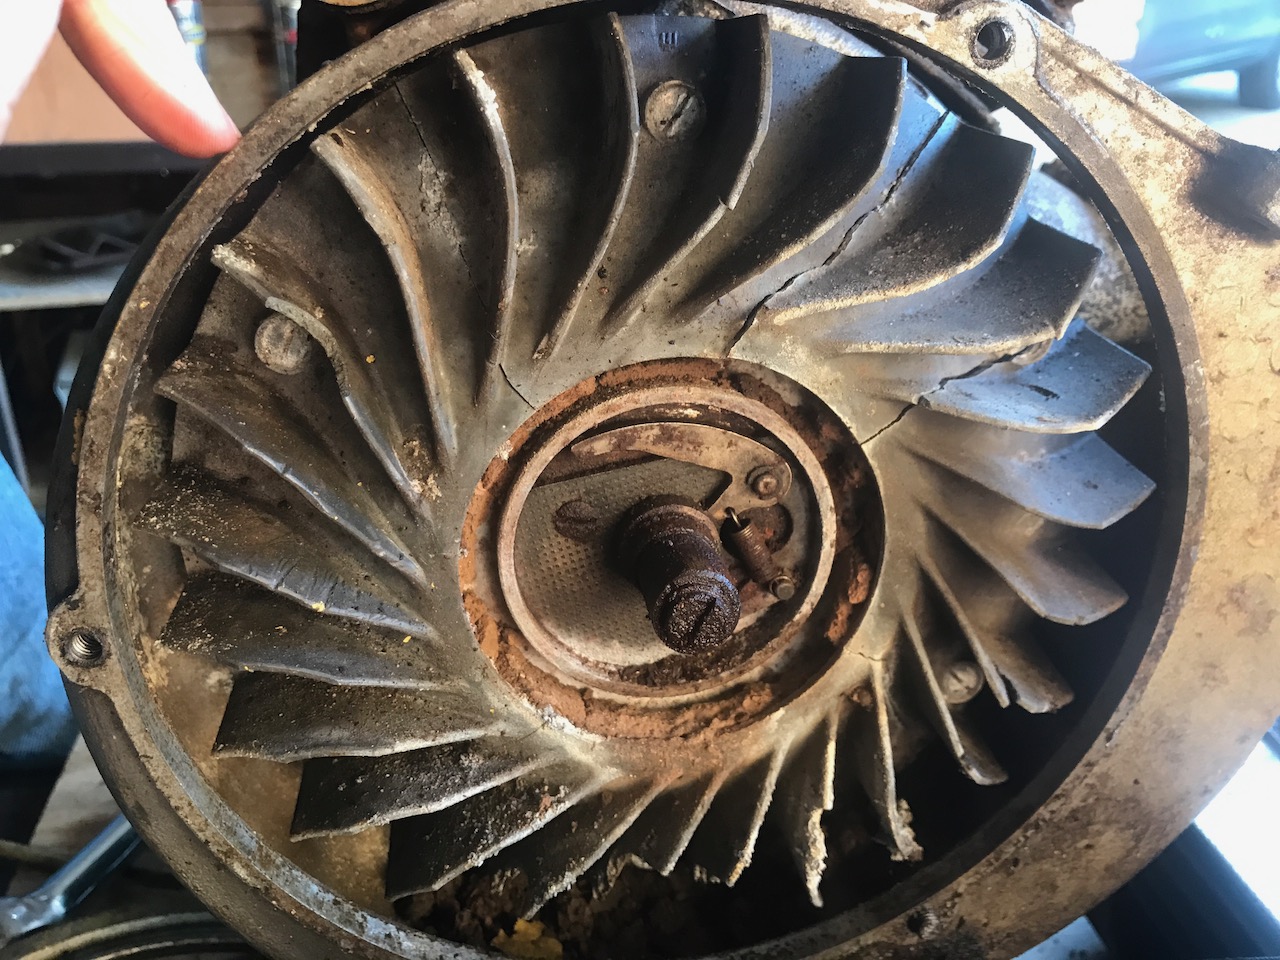
Scoot One fan. Corrosion got the fins most exposed to mud, etc. and I think the corrosion on the underside changed to vol of the metal (Al to Al2O3, e.g.) which caused the catastrophic cracking. Look closely, you can see at least five full breaks.
Apr 9.
Not much to report again... because, again, very little time to spend on the TWiNs. I made a little progress on Two: Fan off, some more shifter parts off, and I flinked the rings out of their seats on the pistons. If I get some time tomorrow, I'll continue trying to remove the wrist pins, and to get the dynastart flywheel off. I was delighted to realize that the spring-loaded dog leg at the center of the hub is a centrifugal spark advance. These scoots are so cool. (2 hr, 22 hr running total.)
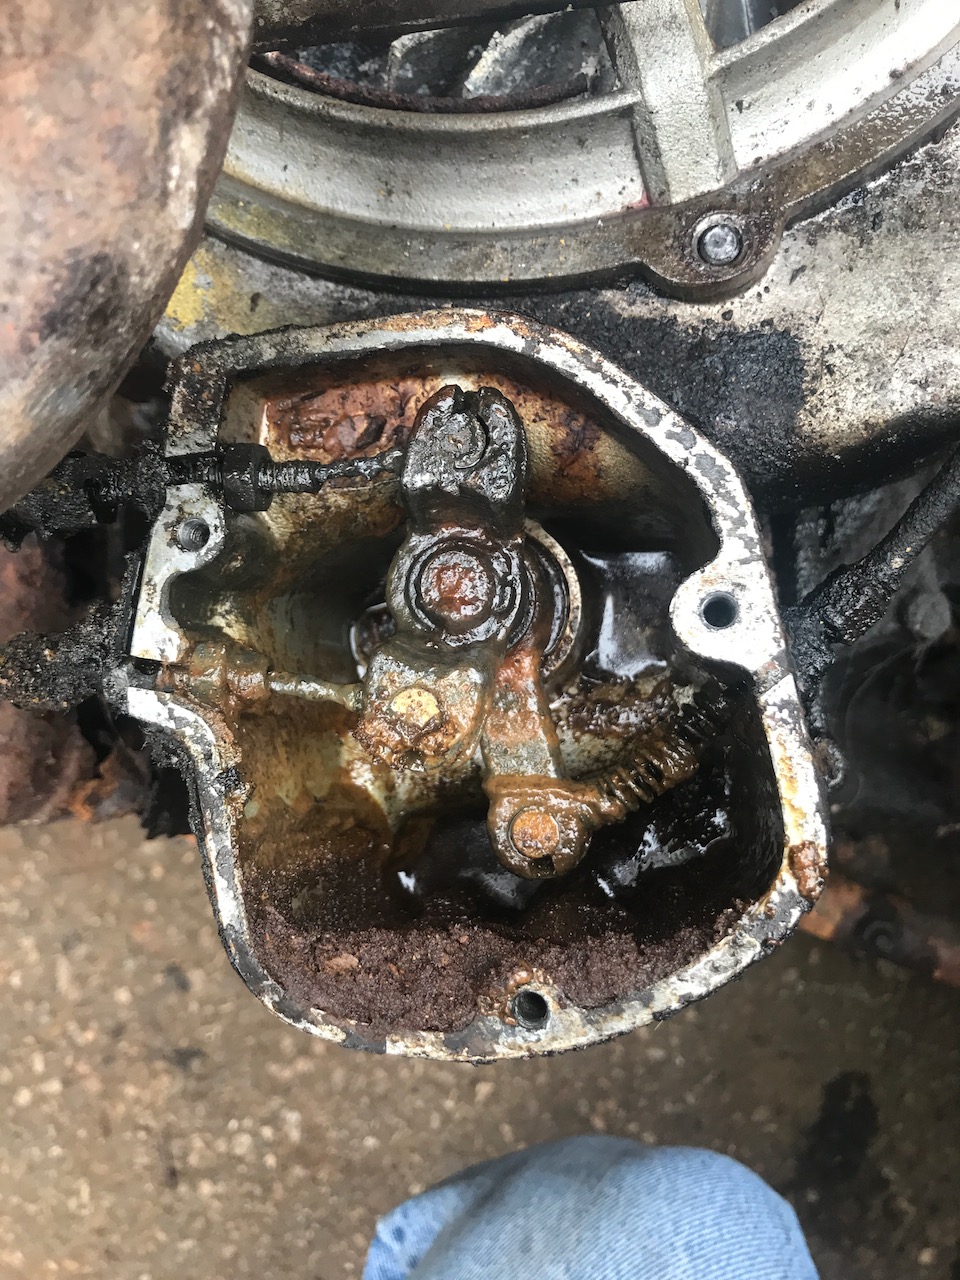
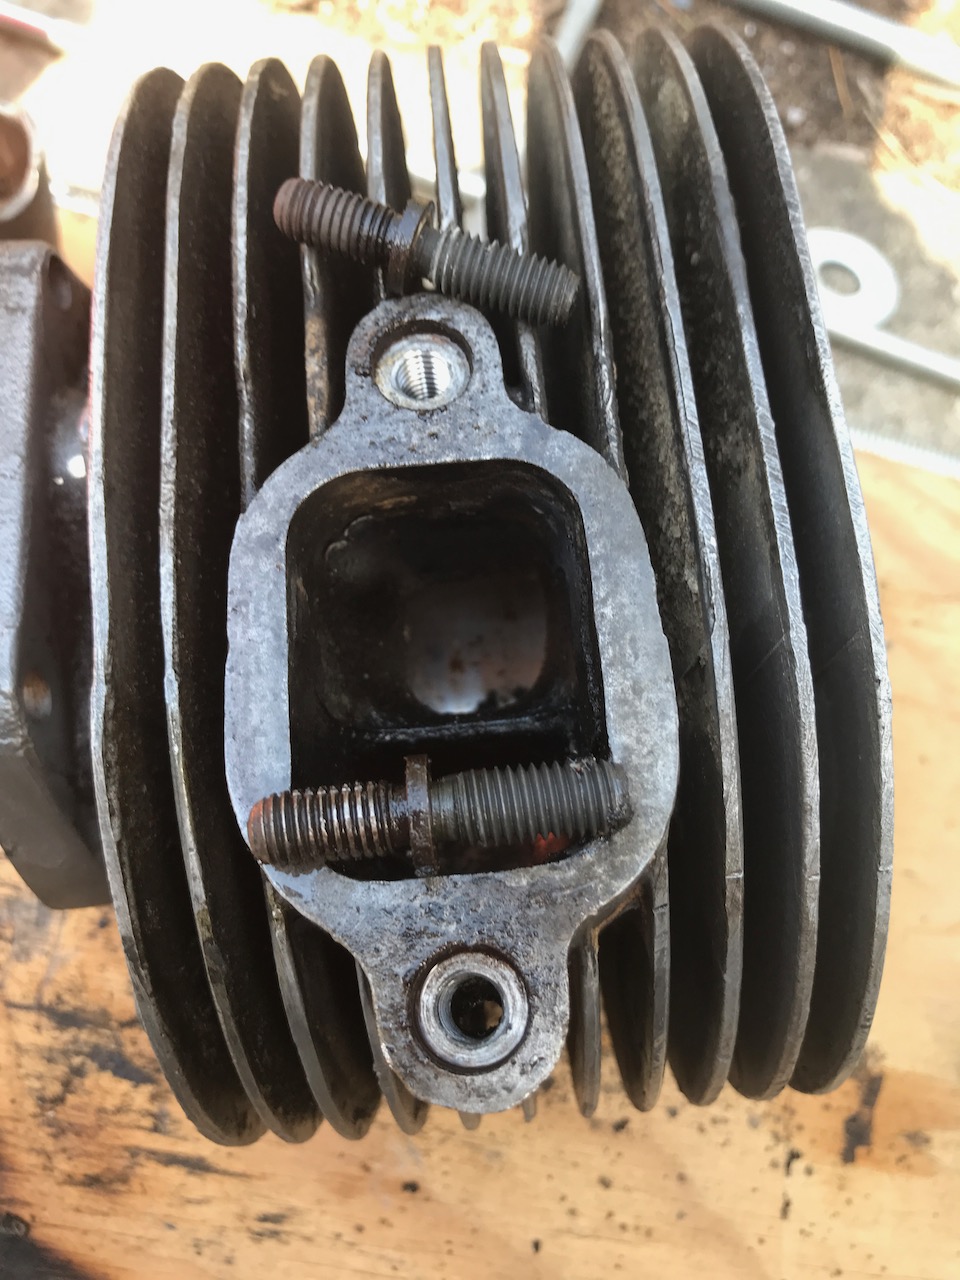
Scoot Two shifter port. Gears work. Below that, the clutch compression lever. The clutch is working at least to the extent that the lever operates... whether the disks are coming apart is another question. It will be useful to have the tail of the powertrain working to rock the stuch crankshaft out of its stuckness!
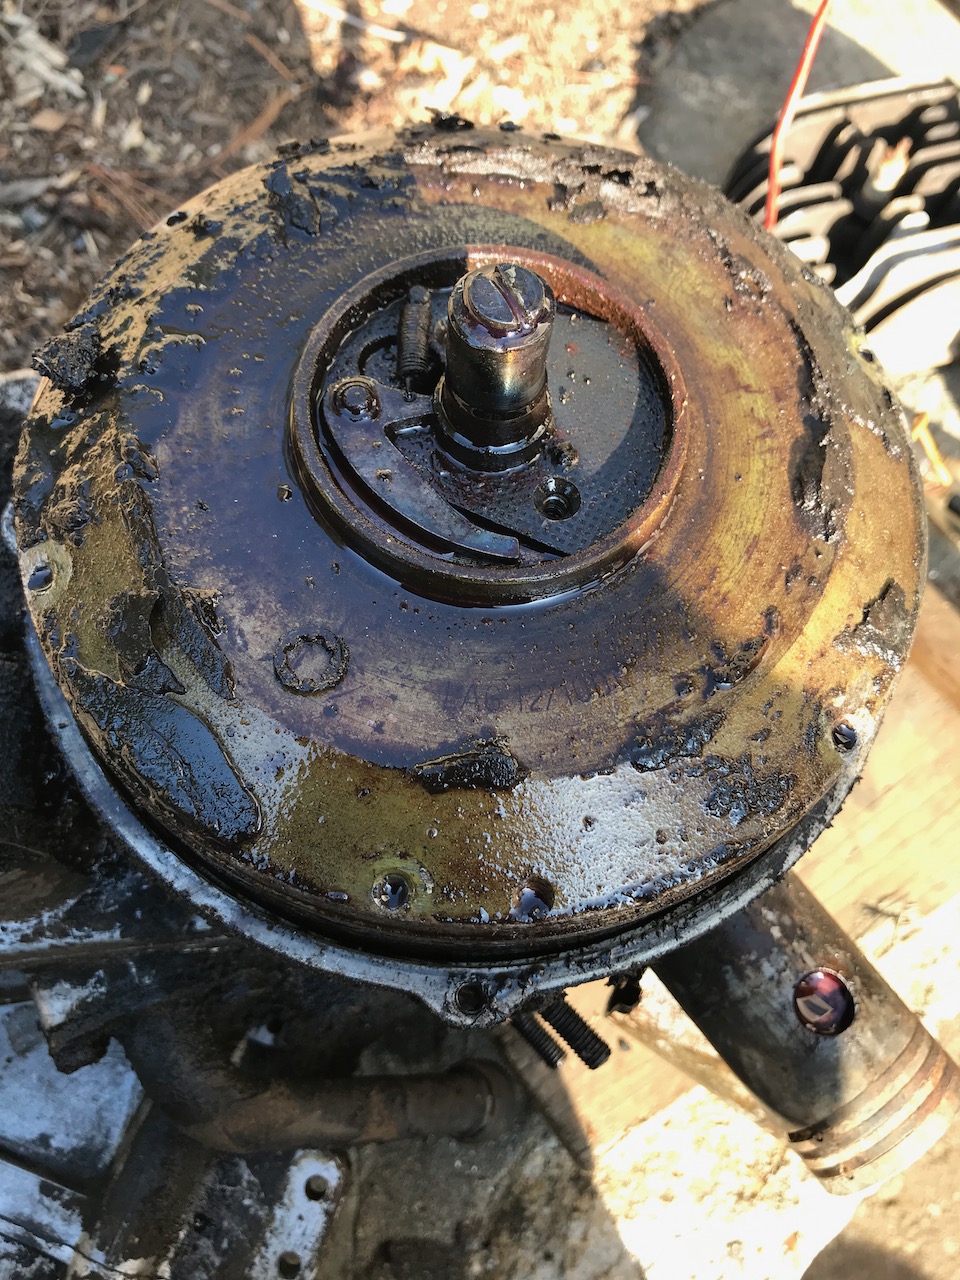
Scoot Two dynastarter flywheel. Note the centrifugal spark-advance mechanism in the middle... rotates the points lobe by a few degrees when dog-leg is "flung" outwards. That whole mechanism should lift out, then I'll be able (I hope) to get the flywheel off. (I may have to lathe up a flywheel puller.) The dynastarter flywheel has to come off for a few reasons: there are brushes in there for bringing current to and from the armature, and they have to be checked, at the very least (!), and I need crankshaft access to ckeck shaft seals, get the crank free, etc.
Apr 10.
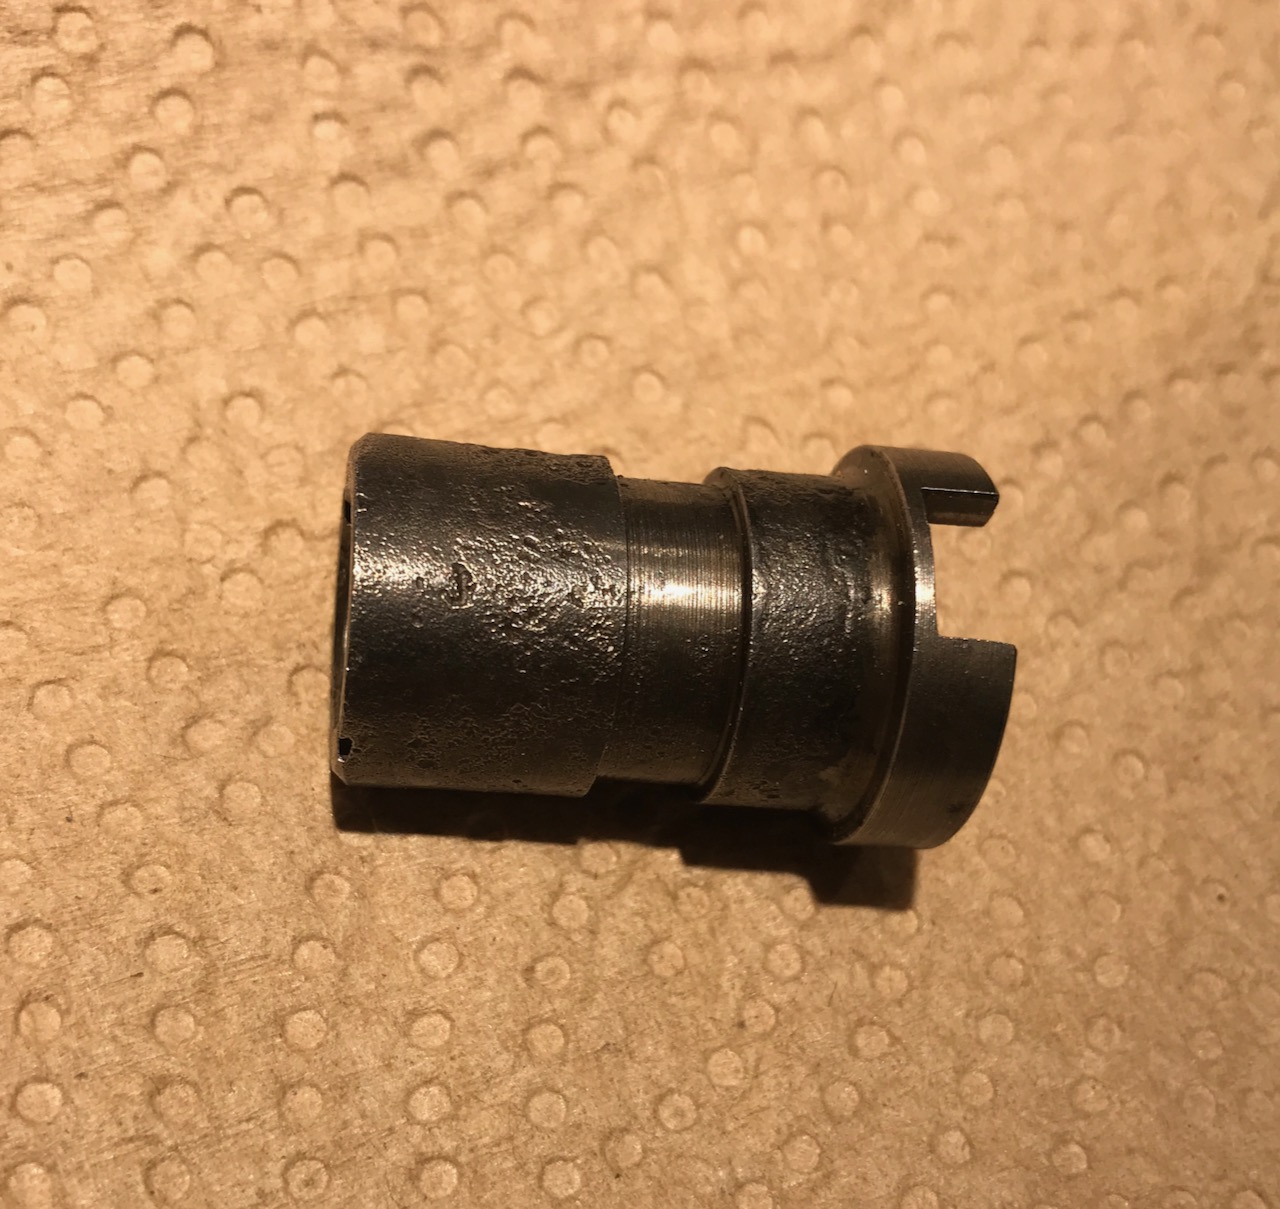
Alrighty! Some progress of a Saturday. Made a flywheel puller. Had to figure out the thread pitch. It came out to -- are you ready? -- 1. Nice: 1 thread per mm. 30mm OD. My lathe isn't metric; approximated to 26 tpi (from the metric-converted 25.4 tpi of one thread per mm). Turned some DOM tubing down to 30mm, cut a thread, and voila. Welded on a 5/8" nut, and it was ready to go. Some more heat and oil, and the thing acquiesced. Cleaned up under the coils, cleaned up the brushes (so they float nicely once again... four of them!) and reassemble for the time being. (2 hr, 24 hr total.)
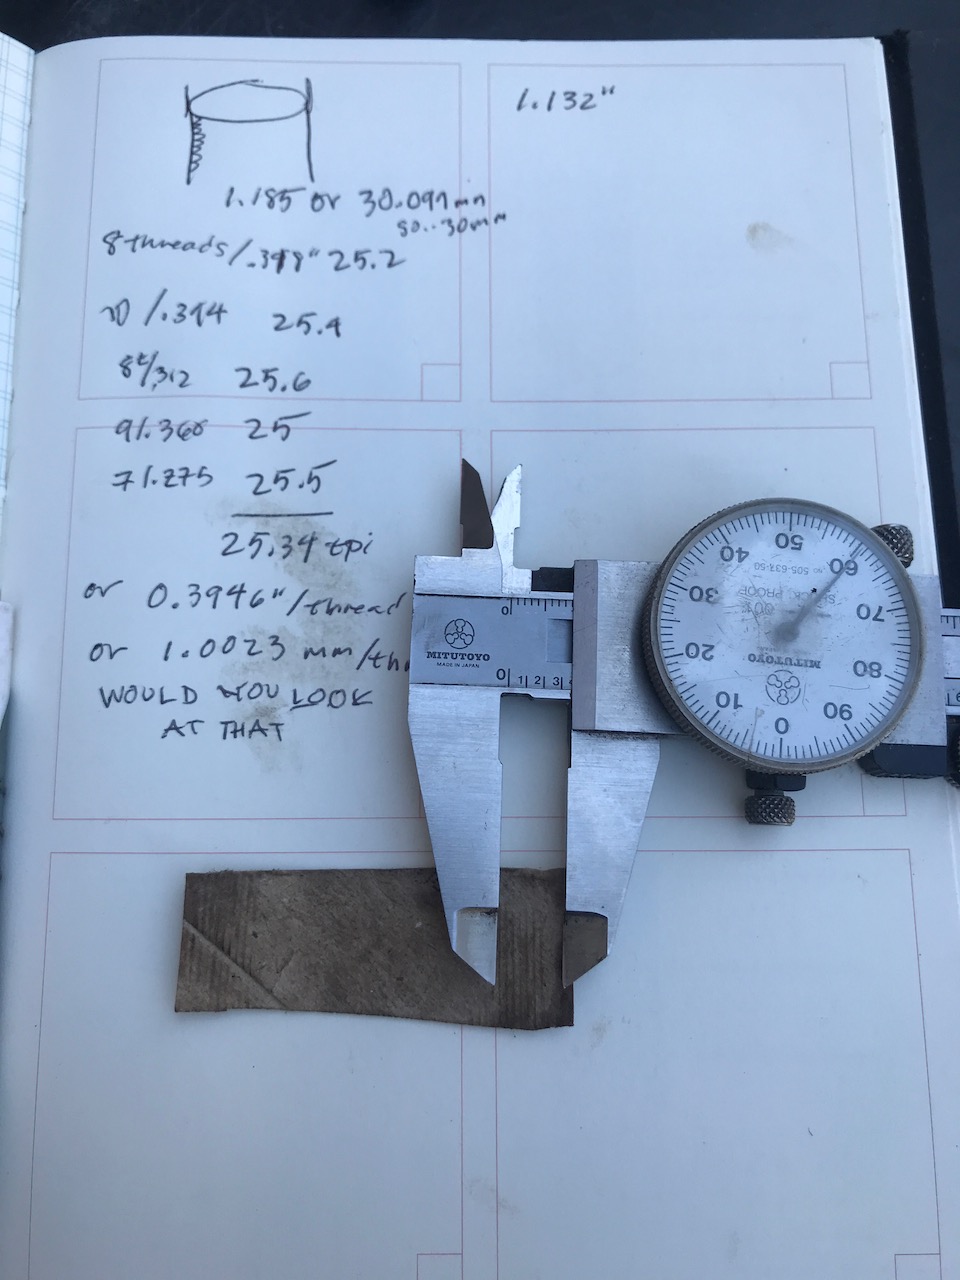
Figuring out the pitch.

Scoot Two dynastarter flywheel, out of the scoot. 30mm x 1mm home-made puller still in the hub.
Apr 19.
Not much time this weekend. Started off feeling loose, somehow ran out of time for everything! Productive but scattered. Nice little piece of progress on the Countess nonetheless. A nugget. Got the pistons off the crank. Heat and oil, heat and oil, and a little home-made pin puller (and *pusher* in the case of the piston with the closed-on-one-end wrist pin!)
Talked to another Contessa owner on Saturday: Bruce. His engine cranks with the dynastart, and the pistons mover freely in a like-new pair of bores. Even has spark! (Head is off at the moment.) He's going to get running in no time... very cool. For me, he's big on the idea of sleeving one of the jugs, instead of replating. Even gave me a resource from his racing days on the East Coast. Interesting! And much appreciated. I'll pursue that path.
Learned a new German phrase, too: innere Schönheit. Yeah, "inner beauty." That's these rusted bikes.
(2 hr, 26 hr total.)

Scoot Two pistons off the crank. I will get replacements for these when they are available (maybe June?) though I think these would serve ok! One is wirebrushed, one is as-pulled.
Apr 20.
Got a half-hour today. Took the timing cam from Scoot One off for Bruce... but by the time I wire-brushed it, it was pretty clear that it had the same corrision problem that sent him looking for a new one. Scoot One spent a lot of time oxidizing.
Got all but the last two studs out of the jug (a necessary step before replating).
(0.5 hr, 26.5 hr total.)

Scoot One timing cam off its post. Pitting makes it tough on the points mechanism.
Scoot Two jug, cleaner than ever (this millenium, anyway). Just the two exhaust port studs left to go!
May 7.
Dribs and drabs of progress. Got the exhaust-port studs out of the jug. Sent the thing off for Nikasil. (Eight to ten week turnaround.) And finally, finally, finally... the crankshaft rotates once again! That took a lot of doing. I believe I need to take the case all the way apart. It means building another extraction device for the coil structure of the dynastarter, aomong other things. More later.
(2.5 hr, 29 hr total.)
Scoot Two jug with the exhaust-port studs finally out.
Scoot Two crankcase, full of Mystery Oil and rust. After some magnet work, it's getting clear in there, and the crank rotates freely! One of those two holes (top and bottom of image) is not completely clear, and it must be: That's where lubrication gets down to the bearings.
May 8.
A little more cleaning and thinking. Used a combination of brake-bleeder vacuum, small drill bits, and compressed air to clear out the blocked lube channel to the chain-side shaft bearing. And later a pretty big moment: Applied voltage to the dynastarter, and it cranked. That's really encouraging. I'm savoring that milestone.
(1 hr, 30 hr total.)
June 17.
Been busy! But not with the scoot. For the scooter, it's all about the jug, now. Met some nice people in this pursuit! I went and visited Tom and Anna (got a bunch of parts, and caught up a little with them which is always time very happily spent), got to know Al from Hot Rod Scooters a bit (what a guy! as nice as he is knowlegable), visited with John and J&M Machine (thanks, Jay H., for the tip! he couldn't help me out, but a great guy and you just want to hang out and watch the action... he did up a PT boat engine once, fer chrissake), Dave at LA Sleeve (tip from John at J&M, sleeving *is* a possibility!) and Chris at Millenium Tech, a plating house. That's where Al sent Tom years ago... and might be the win. Nice guy, that Chris!
Seems like sleeving is a fine option if I could get four or five jugs together to ammortize engineering cost. For now, I've sent a jug to Millenium... I hope they remember their Contessa abilities. (Another plating house, US Chrome, assessed the jug, and decided the bores were too small and too close together for them to do without thousands in jig-building.)
I also caught up with local scootist EP... due for a beer, discussion, and parts exchange with him. He's got a Contessa, too.
(2 hr, 32 hr total.)
July 21.
Still busy! Still not with the scoot. But there has been a little progress. Chris R. at Millennium Tech out in WI has the jug, and has confirmed he can do the Nikasil. (These are the guys Tom/Al sent me to.) He wasn't crazy about the fact that there were two slightly different sized pistons, though! (The originals.) However, Anna came through with the new pistons, and I sent them off to WI yesterday. Still going.
Still looking forward to seeing EP... but I have been traveling. Maybe next week or the week after!
(1 hr, 33 hr total.)
November 15.
Just a little update! Very little progress on the scoot(s). I did, however, go look at a beater today. Nice guy in Worcester came across one. He listed it on fb. Jay H. caught it, and Bruce in IN did, too. Not much there, though.
On the up side, Millenium Tech returned the freshly-plated jug. It's gorgeous. They also repaired one of the cooling fins. Tidy, excellent work all around.
Still haven't got together with EP, or anyone for that matter. Crazy. Time flies, especially in the effed up world of Covid.
I'm gonna add 1 hr to the ledger... the crankcase is full of oil, and I've been fishing out particles with a strong magnet at rate of about 20 min per month.
(1 hr, 34 hr total.)
Fred and I couldn't get to a deal.